Proxmox VE provides two main virtualization models: full QEMU/KVM virtual machines and LXC containers. A VM is the right choice when you need a complete guest operating system with its own kernel, such as Windows, GNU/Linux, FreeBSD, pfSense, or RouterOS.
This guide documents the VM creation workflow in Proxmox VE 7.4. The same core sequence is still recognizable in Proxmox VE 9.2: General, OS, System, Disks, CPU, Memory, Network, and Confirm.
For the current platform, see our Proxmox VE 9.2 introduction. We also preserve the historical Proxmox VE 7.4 installation guide.
Before creating the VM
You need a working Proxmox VE node, storage with enough free space, and—if the guest will be installed from media—an ISO uploaded to storage that allows ISO image content.
The web interface normally listens on:
https://PROXMOX_HOST_OR_IP:8006In a real environment, use a protected management network, a proper hostname, and trusted TLS where appropriate. Exposing port 8006 directly to the public Internet is not a recommended remote-management design.
1. Open the Create VM wizard
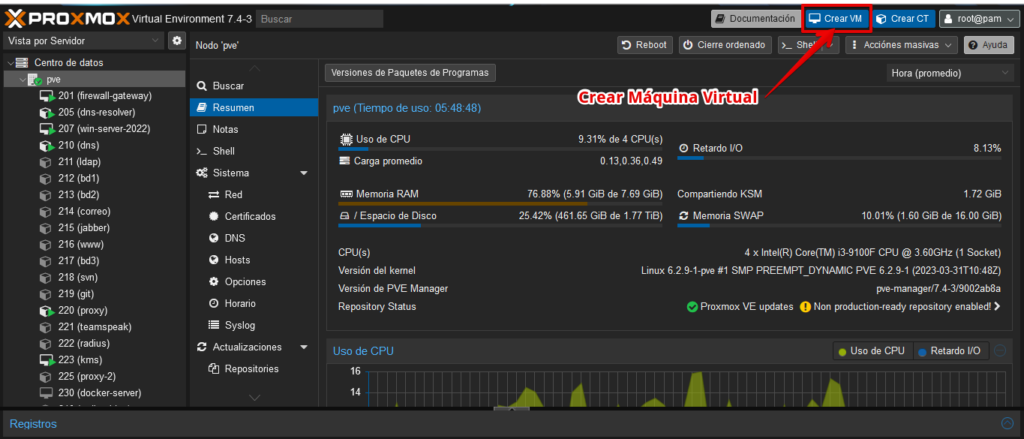
Proxmox VE 9.x looks somewhat different, but the resource tree and VM creation workflow remain familiar.
2. General: node, VMID, and name
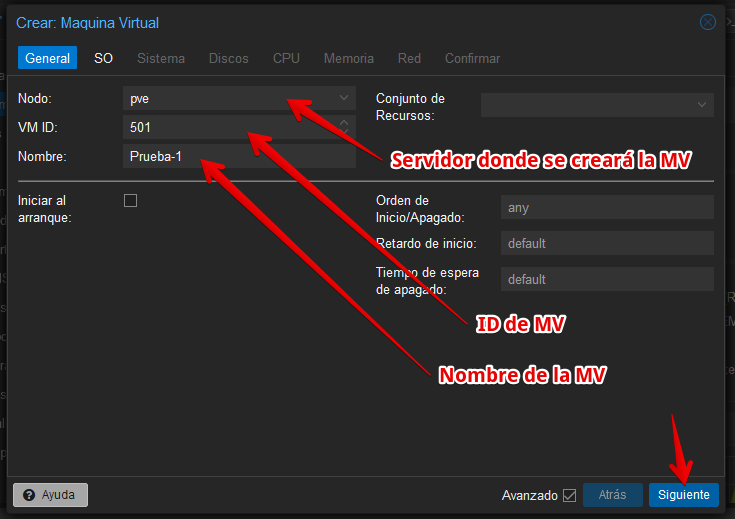
In a cluster, select the node on which the VM will initially be created.
The VMID uniquely identifies a VM or container across the cluster. Older installations commonly used IDs beginning around 100. Current Proxmox VE can define the range used when suggesting the next free VMID under Datacenter options, while the ID itself still needs to be unique.
Use a meaningful guest name. Consistent naming becomes particularly valuable in larger environments, for example:
srv-dns-01
web-prod-02
db-postgresql-01
3. OS: select the ISO and guest type
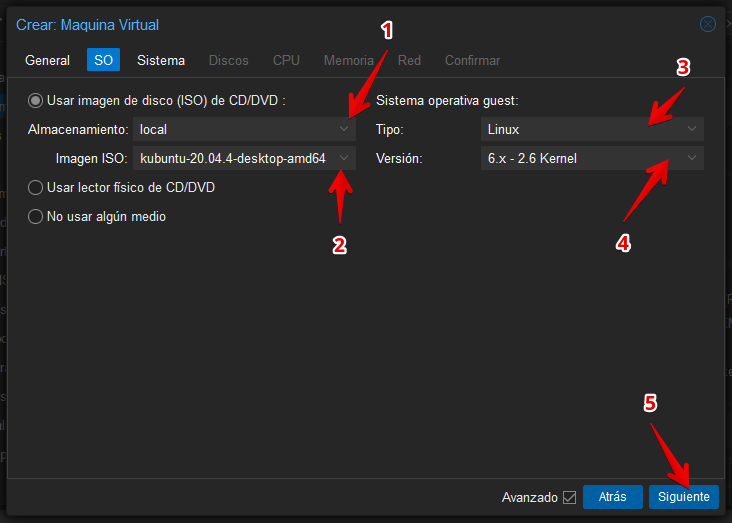
The original example used a Kubuntu ISO stored on local. Select the image you actually intend to install and choose the closest operating-system family.
Modern Proxmox VE also supports workflows such as VM import and Cloud-Init templates, but this guide focuses on the traditional installation-from-ISO path.
4. System: machine type, firmware, EFI, TPM, and QEMU Guest Agent
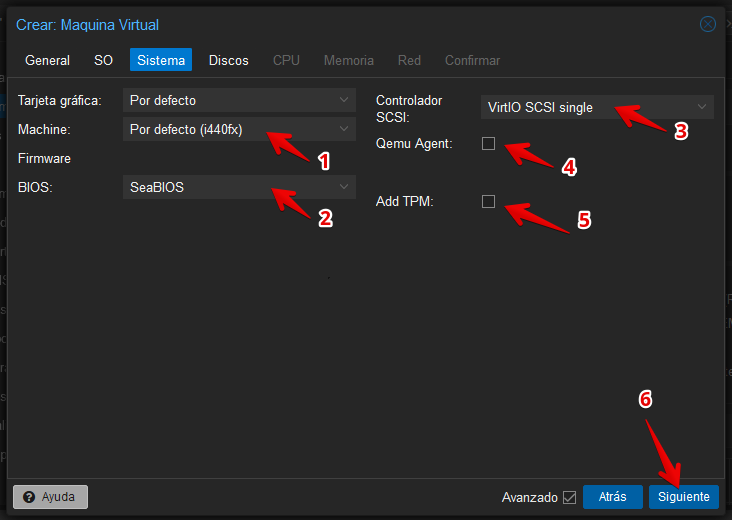
i440fx or q35
i440fx emulates an older PC platform and remains useful for compatibility with legacy guests. q35 provides a more modern PCI Express-based platform and is generally a better fit for current operating systems when legacy compatibility is not required.
On Proxmox VE 9.2, q35 is a natural choice for modern Windows guests, PCIe passthrough scenarios, and recent virtual hardware.
SeaBIOS or OVMF/UEFI
SeaBIOS provides traditional BIOS boot. OVMF provides UEFI.
Modern guests—especially Windows 11—are commonly configured with q35 + OVMF. An EFI Disk should be added so UEFI variables persist.
TPM
A virtual TPM is not required for every VM. It becomes relevant when the guest or security policy requires it, including standard Windows 11 deployments with TPM 2.0 and some full-disk-encryption designs.
QEMU Guest Agent
An important correction to the original text: the QEMU Guest Agent is not what makes a VM run. The VM can operate without it.
The agent runs inside the guest and improves communication with Proxmox. It can help report guest IP addresses, perform clean shutdowns, coordinate filesystem freeze/thaw for backups, and support selected host-to-guest operations.
On Debian or Ubuntu guests:
sudo apt install qemu-guest-agent
sudo systemctl enable --now qemu-guest-agent
The corresponding QEMU Guest Agent option must also be enabled in the VM configuration.
5. Disks: an important recommendation changed after 7.4
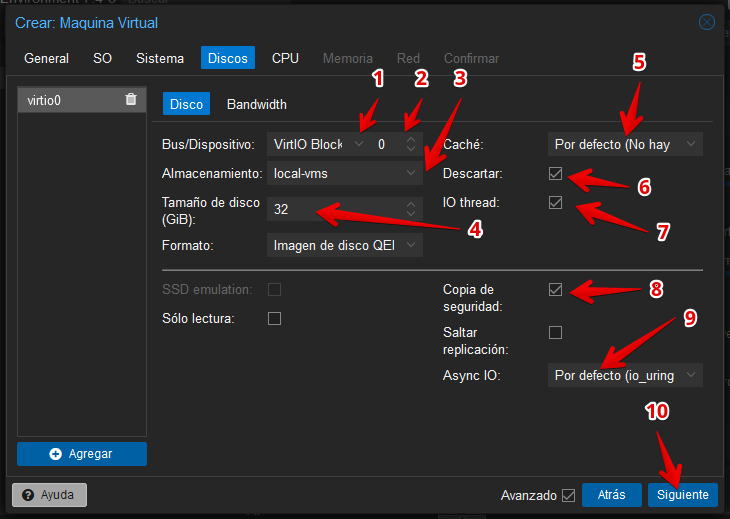
The original guide recommended VirtIO Block. Current Proxmox guidance generally favors a SCSI disk with the VirtIO SCSI single controller for new guests. This keeps VirtIO’s low overhead while supporting per-disk IO threads efficiently.
A modern baseline is:
- Bus/Device: SCSI;
- SCSI Controller: VirtIO SCSI single;
- IO thread: enable where appropriate;
- Discard: enable when the storage is thin-provisioned and the guest supports TRIM/UNMAP;
- Backup: keep enabled for disks that belong in VM backups.
Windows VirtIO drivers
Windows may need VirtIO drivers during installation to see a VirtIO SCSI disk or use a VirtIO network adapter.
Official resources:
At the time of this review, the stable download redirects to the 0.1.302 series, so the old 0.1.229 build from the original article should no longer be hard-coded as the current version.
Disk cache
The older rule “use Write back with a UPS, Write through without one” is too broad. Current deployments should normally keep the default cache mode unless there is a specific reason to tune it.
The correct choice depends on the entire storage stack: ZFS, Ceph, LVM-thin, directory storage, NFS, SAN, host caching, and the workload itself.
Discard
Discard passes TRIM/UNMAP information from the guest to compatible storage. It is useful with thin-provisioned backends, but support is required throughout the guest filesystem, virtual controller, and storage layer.
6. CPU: sockets, cores, and CPU model
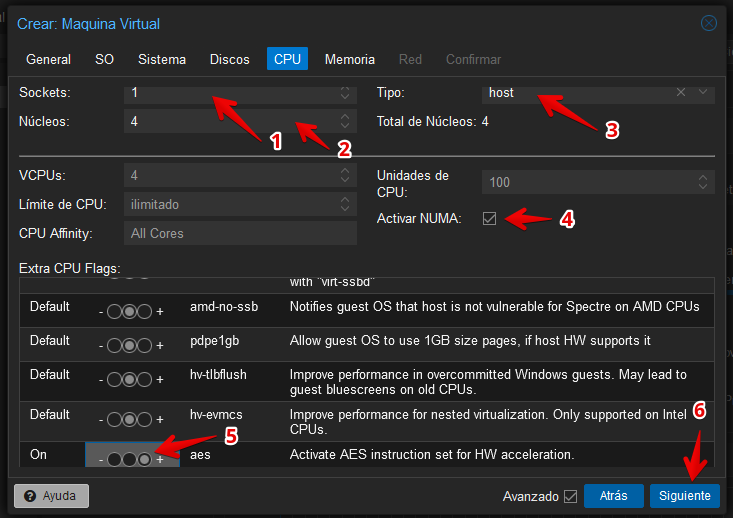
For most VMs, a small number of sockets with multiple cores is simpler than presenting many virtual sockets, unless guest licensing or software topology requires something else.
The host CPU model has a migration tradeoff
host exposes the physical CPU’s capabilities closely and can provide excellent performance. The tradeoff is live-migration compatibility: moving the guest to a node with a different processor may fail or expose a different feature set.
Current Proxmox guidance is to use host when the relevant nodes have matching CPU models and migration compatibility is not a concern. In heterogeneous clusters, use a common generic x86-64-v* baseline supported by every node.
NUMA
The old article suggested enabling NUMA whenever more than one core was assigned. That is not correct.
NUMA becomes valuable mainly for larger VMs where the virtual topology should reflect a NUMA host and memory/CPU placement spans NUMA nodes. A small 2-, 4-, or 8-vCPU guest normally does not need NUMA merely because it has multiple cores.
AES and manual CPU flags
Do not add flags such as aes arbitrarily. With host, supported physical CPU features are already exposed. With generic CPU models, choose a baseline intentionally based on guest requirements and migration compatibility.
7. Memory: fixed allocation and ballooning
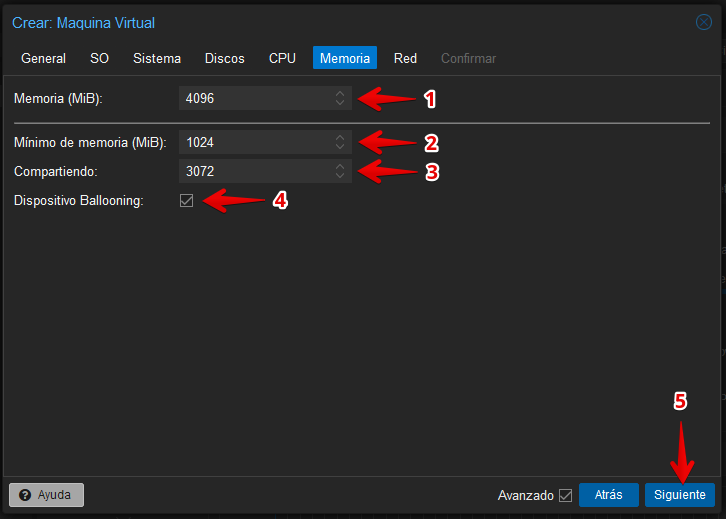
Ballooning does not mean that part of the VM’s RAM becomes a generic “shared memory pool.” The balloon driver allows the host to reclaim guest memory under controlled conditions, subject to the configured minimum and guest-driver support.
Memory overcommit can be useful, but it must be planned. A host under severe memory pressure can swap heavily or invoke the Linux OOM killer.
8. Network: bridge, VLAN, firewall, and VirtIO
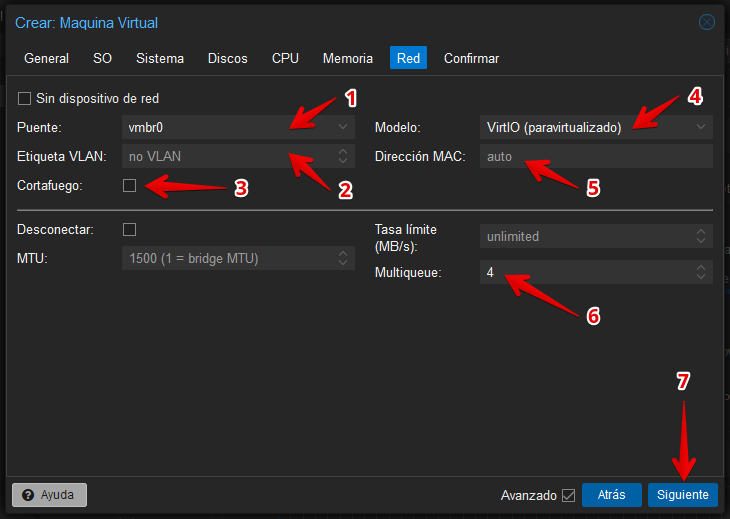
Most guests connect to a Linux bridge such as vmbr0. A VLAN tag can be assigned when the surrounding network is configured for VLANs.
VirtIO remains the preferred NIC model for supported guests because it has lower overhead than fully emulated adapters. Windows guests need the NetKVM driver from virtio-win.
The Firewall checkbox enables that virtual NIC’s integration with the Proxmox firewall. It does not automatically create a secure policy; rules still need to be designed at the appropriate Datacenter, node, and guest levels.
Multiqueue
Multiqueue can increase throughput for busy guests with multiple vCPUs, but the queue count does not always need to equal the vCPU count. More queues also add processing overhead.
For small guests, the default is often sufficient.
9. Confirm the configuration
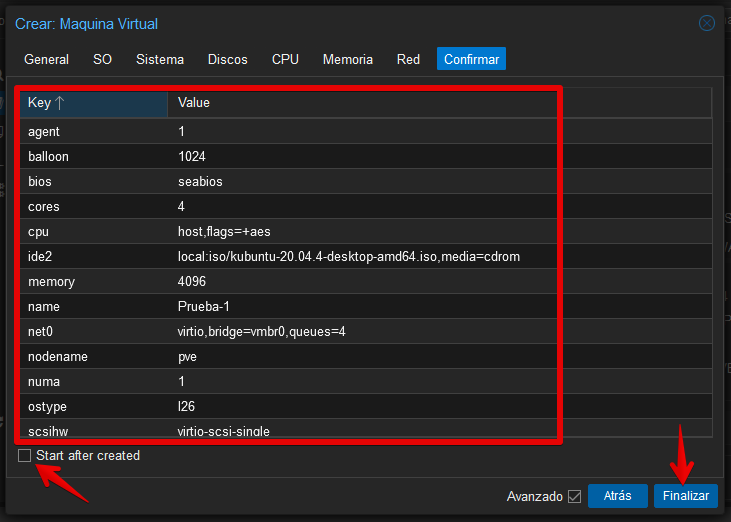
Double-check the VMID, ISO, machine type, firmware, EFI/TPM requirements, disk storage, CPU, RAM, bridge, and VLAN before clicking Finish.
Start after created can boot the VM immediately.
10. Start and inspect the VM
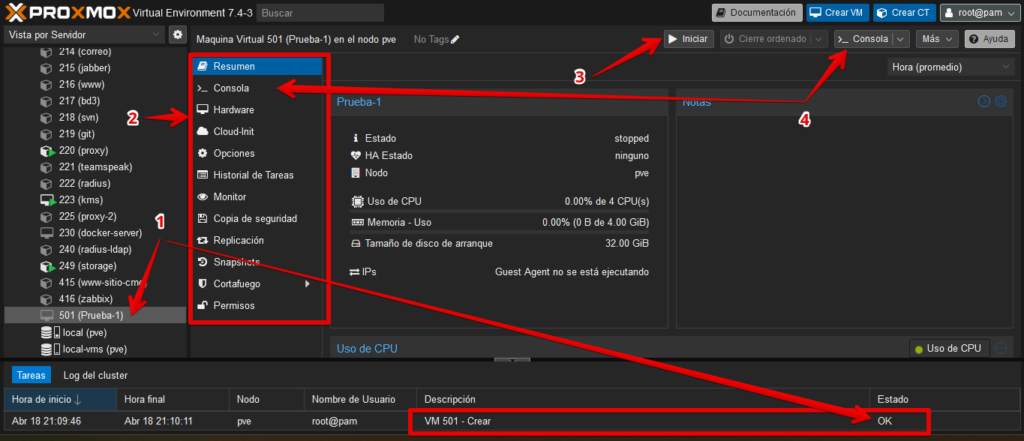
The exact labels have evolved, but the main guest-management areas still include:
- Summary for status and metrics;
- Console for the guest display;
- Hardware for virtual devices;
- Cloud-Init for initializing compatible guest images;
- Options for boot order, start-at-boot, and other guest behavior;
- Task History for operations;
- Monitor for the QEMU monitor;
- Backup for guest backups;
- Replication for compatible cluster storage replication, notably local ZFS workflows;
- Snapshots for point-in-time guest states—not a replacement for backups;
- Firewall and Permissions.
Another correction from the original article: Cloud-Init is not “Proxmox’s cloud service.” It is a widely used standard for initializing cloud and virtual-machine images with users, SSH keys, networking, and other first-boot settings.
11. Open the console and install the guest OS
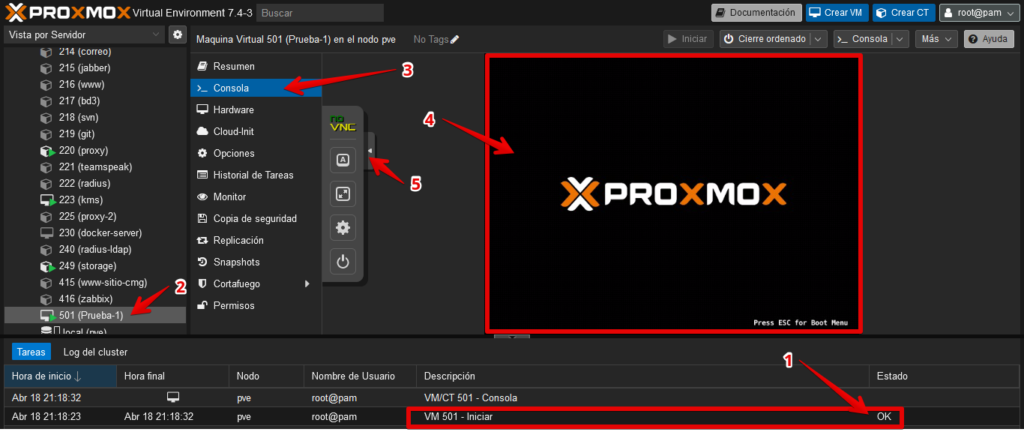
From here, install the operating system normally.
KVM with paravirtualized VirtIO devices can provide performance close to native hardware, but there is no universal “3 percent virtualization penalty.” Overhead depends on CPU, storage, networking, workload, NUMA topology, passthrough, and configuration.
A sensible Proxmox VE 9.2 baseline for a modern Linux VM
- Machine: q35 unless legacy compatibility is required;
- Firmware: OVMF/UEFI when supported by the guest;
- CPU: host on a single host or homogeneous cluster, common baseline on heterogeneous clusters;
- Disk: SCSI + VirtIO SCSI single;
- IO thread where appropriate;
- Discard on compatible thin-provisioned storage;
- NIC: VirtIO;
- QEMU Guest Agent enabled and installed;
- no TPM unless the guest or policy requires one.
A sensible Windows 11 baseline
- Machine: q35;
- Firmware: OVMF/UEFI;
- EFI Disk;
- TPM 2.0;
- SCSI + VirtIO SCSI single;
- Windows ISO plus virtio-win ISO as an additional CD/DVD drive;
- VirtIO NIC;
- QEMU Guest Agent after Windows installation.
Why keep this Proxmox VE 7.4 guide?
The interface has evolved, but the core architectural decisions remain the same: firmware, machine type, CPU compatibility, storage, networking, and paravirtualized devices.
Keeping the original screenshots makes the article useful for older installations while the notes explain how those decisions map to Proxmox VE 9.2.