
Among the most popular and used content management systems (CMS) on the entire internet is WordPress. In this article we will explain the process of WordPress installation from scratch and step by step on a virtual private server (VPS) from the command terminal in a quick and easy way.
Software requirements for WordPress
- Web Server
- PHP
- Database server (MySQL or MariaDB)
Requirements to follow this guide
- A few minutes to carefully read and follow this guide
- A domain previously configured with a type “A” record pointing to the server (example: www.mysite.com –> Public IP on the internet of the site hosting server)
- A virtual private server (VPS) on any provider on the Internet could even be a real server or a computer that we have.
- That the server has access to the internet to carry out the installation
- That we have Linux Ubuntu 20.04 installed (we can use another, but in this guide we will use that distribution as it is one of the most popular for VPS servers).
What is a VPS?
VPS : Virtual Private Server or in Spanish, Virtual Private Server, in simple terms, a virtual server to which we have full administrative access via SSH. In most services provided on the Internet of this type, they are virtual machines known as instances.
What is LAMP?
LAMP : is an application support stack made up of Linux , Apache , M ySQL and P HP, although there are others such as WAMP, LEMP, WEMP, LAPP and many more. In this guide we will use LAMP because it is the most popular in all web hosting services for WordPress on the internet.
Preparing Linux
The first thing is to access the server using SSH or another way to access the command shell. Once inside the server to begin preparing the deployment environment, the first step is to verify that the Linux server has the properly configured software repositories. In our case, as we are using Ubuntu 20.04, using the following configuration lines in the
/etc/apt/sources.list file
#--- Official online repositories of Ubuntu 20.04 (Focal) ---
deb http://archive.ubuntu.com/ubuntu focal main universe multiverse restricted
deb http://archive.ubuntu.com/ubuntu focal-security main universe multiverse restricted
deb http://archive.ubuntu.com/ubuntu focal-updates main universe multiverse restricted
deb http://archive.ubuntu.com/ubuntu focal-proposed main universe multiverse restricted
deb http://archive.ubuntu.com/ubuntu focal-backports main universe multiverse restricted
Next we will proceed to reload the repository indexes using the command
sudo apt updateThen to guarantee that the system is completely updated we will execute the command
sudo apt full-upgradeOnce the system update is complete, we verify that the server has the date and time correctly and the time zone properly configured. Attention, this is of utmost importance since many important factors depend on the date and time of the system.
We can see the date and time with the command
dateIf the date and time are incorrect, we must fix it before continuing with this guide.
Install MySQL
To install the MySQL relational database server from the Linux repositories themselves we will use the command shown below.
sudo apt install mysql-server mysql-clientOnce the installation is complete, we will execute the mysql_secure_installation command to change some basic values in the configuration of our server.
sudo mysql_secure_installation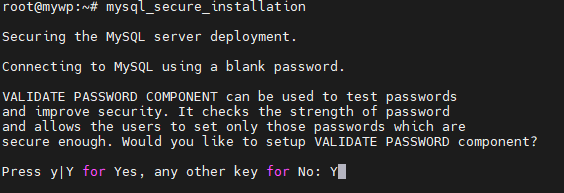
We press Y and enter to continue

Choose option 2, and press enter
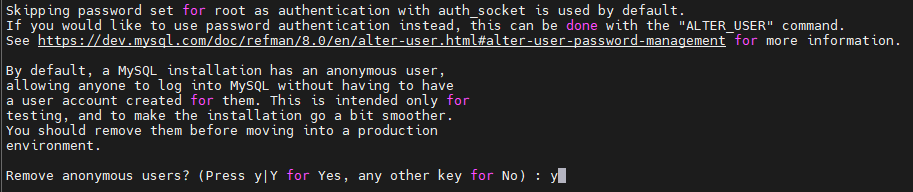
Later, we press “y” and enter to continue

Again we press “y” and enter to continue

We press “y” again and enter to continue

“y” and enter to finish the wizard.
The next thing we will do is secure the root user with a strong password. This user should only be used for administrative tasks within the server. Our next step will be to access the newly installed mysql database server and change the root user password.
//-Connect to mysql server
mysql -h localhost -u root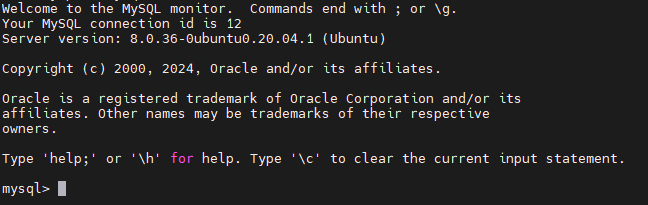
In the mysql server prompt we will change the root user password by executing the following query. Note that there we will specify the password you will use, feel free to choose one. Keep in mind that the password must meet complexity parameters (More than 8 characters, upper and lower case letters, numbers and special characters). For our example we will use the password: My.New.P455w0rd.Strong* , this is just an example, please do not use this one and generate your own. You can use a password generator like LastPass Online and write it down just like your next important information so you don’t forget it.
Now to change the password of the root user we execute the following query.
ALTER USER 'root'@'localhost' IDENTIFIED BY 'My.New.P455w0rd.Strong*';The output should look like the image below

The next step we will do within the database server is to create a database for our new wordpress by running the query below. In this case we will call it mywpdb but you can use whatever name you want.
//-Create the database called mywpdb.
CREATE DATABASE mywpdb CHARACTER SET utf8mb4 COLLATE utf8mb4_unicode_ci;
Next we will create a user that will be used by the WordPress application to access the database, since the root user should not be used for security reasons. The new user will only have access to the wordpress database. Again generate a strong password for this user. You can use a password generator like LastPass Online
//-Create the user that will be used to access the database: mywpuser
CREATE USER 'mywpuser '@'localhost' IDENTIFIED BY 'UW3.s9TF9@*';
The next step is to grant the permissions to the user we just created on the database that our WordPress will use.
//-Assign permissions to the created user to the database
grant all on mywpdb .* to 'mywpuser '@'localhost';
All we have to do is reload all the permissions and exit the mysql database server console, for that we will execute the two commands below.
//-Reload the permissions assigned to the new user on the database that was created
flush privileges;
//-quit mysql database server
quit
At this point we already have:
- Changed root user password
- Database created
- Created the user who will use the wordpress
- Assigned user permissions on the database
Install Apache web server
To install WordPress, it is necessary to install the Apache web server, to do this we will execute the following command in the console of our VPS
sudo apt install apache2 opensslOnce the Apache installation is complete, if we have a DNS record of type “ A ” pointing to the IP address of the server, we can open a web browser and enter the url that would be as follows: http://miregistrotipoa. My domain
For example: If we have the domain “mysite.com” and the IP of our server is 120.10.15.1 and we add the type “A” record called www to our domain provider , pointing to the IP of our VPS server, we would have the following url: www.misitio.com which we open in our favorite web browser. We should now be able to see the server page as shown in the image below.
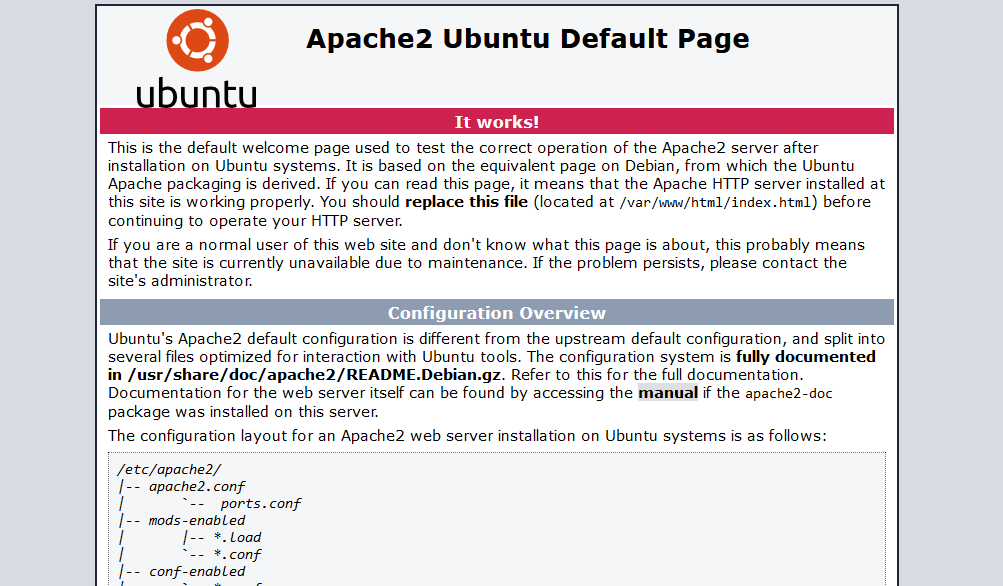
If we see a page as shown in the image we already have the web server installed, so we proceed to install the PHP interpreter that our web server will use.
Install the PHP interpreter and use with the Apache module.
To install the php we will use the third-party repository ondrej/php.
When we are going to add third-party repositories we must install the “software-properties-common” software package which we will install with the command
apt install software-properties-commonTo add this repository to our system we will execute the following command
add-apt-repository ppa:ondrej/php Once the command has been executed, it will ask us to press Enter to continue or Ctrol+c to cancel, as shown in the following image
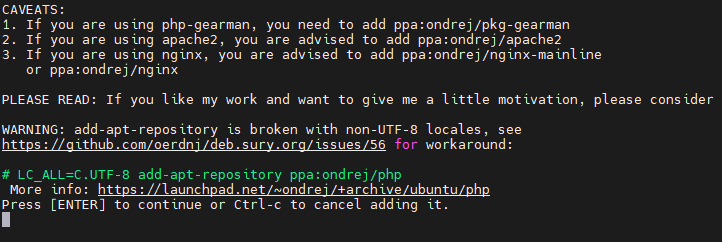
In our case to add the repository we will press enter.
Once the third-party repository has been added, we will proceed to install PHP 8.2 using the following command. Please note that the following command is a single line.
apt install php8.2-cgi php8.2-cli php8.2-common php8.2-curl php8.2-enchant php8.2-gd php8.2-gmp php8.2-igbinary php8.2-imagick php8.2-intl php8.2-ldap php8.2-mbstring php8.2-memcached php8.2-msgpack php8.2-mysql php8.2-odbc php8.2-opcache php8.2-redis php8.2-soap php8.2-sqlite3 php8.2-tidy php8.2-xml php8.2-xsl php8.2-zip php8.2-apcu php8.2-bcmath php8.2-bz2 libapache2-mod-php8.2
After installing the PHP with all the specified extensions, we restart the apache with the below command and we will create the index.php file to test that the php was successfully integrated into the apache web server.
// Command to restart apache web server
sudo systemctl restart apache2
Command to create index.php file in the default root of the Apache web server by calling the PHP information function.
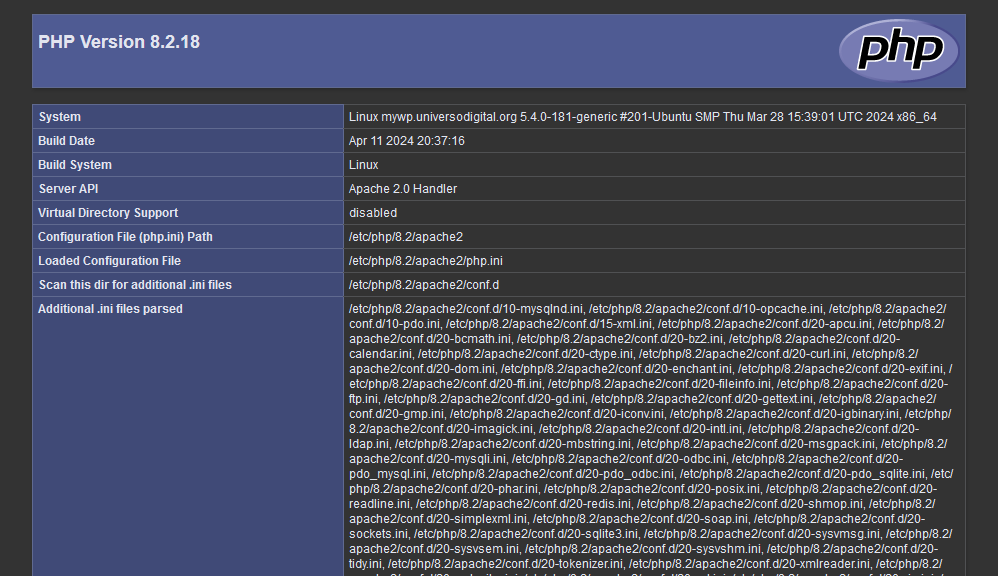
echo "<?php phpinfo();?>" > /var/www/html/index.phpIf everything was done correctly, we enter the url we tested previously and add /index.php to the end of the url (example: http://www.misitio.com /index.php ). We should see a page like the one shown below.
Optimize PHP
To optimize the performance of the PHP interpreter for our WordPress we will make some changes to the PHP configuration file. To make the changes we will edit the configuration file using the nano editor in the console but you can use whatever you want.
//-Edit PHP configuration file used by Apache web server
nano /etc/php/8.2/apache2/php.ini
The PHP configuration file is very long and full of comments, which are the lines that begin with “;”
Inside the configuration file if we use the nano console editor we can search by pressing Control+W and typing a part of what you want to search for and press the enter key.
//-Change these values, if any are commented, remove the “;” in front and assign it the value shown in the table below.
; configuration parameter = value

realpath_cache_size = 5M
realpath_cache_ttl = 3600

max_execution_time = 300
max_input_time = 120
max_input_vars = 10000

;This specifies the maximum memory limit that PHP can use.
memory_limit = 1024M

;Defines the maximum content size of a request
;A large value is useful when uploading large files
post_max_size = 1024M
file_uploads = On
upload_max_filesize = 1024M

; This parameter must be adapted to the time zone where the server is located
date.timezone = Europe/Madrid

opcache.enable = 1
opcache.enable_cli = 1
opcache.memory_consumption = 256M
opcache.max_accelerated_files = 80000
opcache.use_cwd = 1
opcache.save_comments = 1
After changing the aforementioned parameters, press Control+X to exit the editor and it will show us a message like the following asking if we want to save the changes.

We will press Y

Finally we press enter so that it saves everything to the file shown in the highlighted line.
Next we restart the web server so that it takes the parameters with the values that we have previously configured.
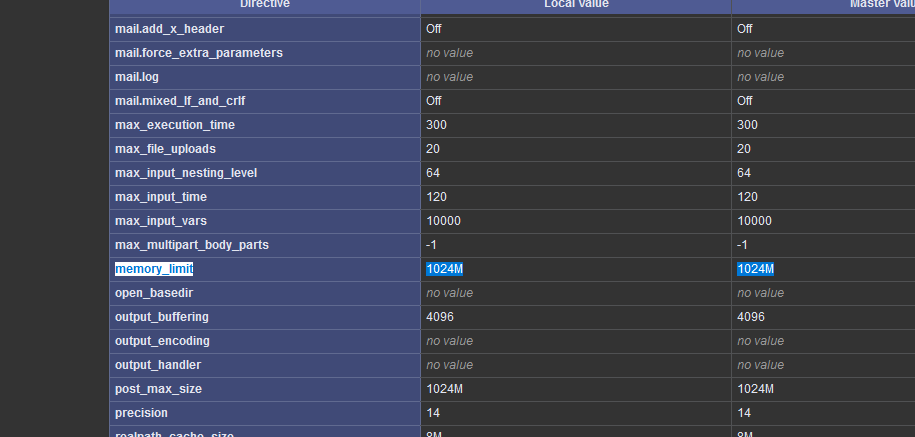
sudo systemctl restart apache2 If everything has gone well, we return to the previously seen url that ends in /index.php and on the page that appears we can search for the values that we changed in the previous steps,
example:
At this point we must already have the Apache2 web server and integrated PHP installed. Now we will proceed to configure the Apache virtualhost for our WordPress.
Apache VirtualHost
//-Create the apache virtualhost file for our wordpress.
nano /etc/apache2/sites-available/mywordpress.confWhen you open the editor in the console we put the following content inside, remember to replace “www.mysite.com” with the name of your server, the one you have pointing to that server through the type A record on your domain.
 <VirtualHost *:80>
	ServerName  www.mysite.com
	ServerAdmin webmaster@misitio.com

	DocumentRoot /var/www/html/wordpress
	DirectoryIndex index.php
	AddDefaultCharset UTF-8

	<Directory "/var/www/html/wordpress">
	    Options Indexes FollowSymLinks MultiViews
	    AllowOverride All
	    Order allow,deny
	    allow from all
	    Require all granted
	</Directory>

	ErrorLog ${APACHE_LOG_DIR}/error.log
	CustomLog ${APACHE_LOG_DIR}/access.log combined

</VirtualHost>
Once the content is established, we close the nano with Control+X, “y” to tell it if we want to save and enter.
Up to this point we have prepared part of the environment but we haven’t touched anything about WordPress yet, so let’s get started.
WordPress installation
// Move to the root folder of the web server
cd /var/www/html
The next step is to download WordPress, which we can download from its official site. Use either command depending on the language you want to have it in.
//-Download wordpress in english
wget https://wordpress.org/latest.zip -O wordpress.zip
//-Download wordpress in Spanish
wget https://es.wordpress.org/latest-es_ES.zip -O wordpress.zipIf it was downloaded correctly then we continue, otherwise you will have to download it to your PC and upload it to the server to the location /var/www/html/ to continue with this step by step guide
//-Unzip the file
unzip wordpress.zip
//-Change folder permissions
chmod 755 -R wordpress///-We change the folder owner so that the web server user (www-data) can write without problems
chown www-data:www-data wordpress -R
a2ensite mywordpress

a2dissite 000-default

systemctl restart apache2
Now we try to access the site’s url through the browser and the wordpress page should appear. We still don’t have to do anything there, it’s just to check that the virtual host is working correctly. We still need to make it work over https with the Let’s Encrypt certificates, which is our next step.

Let’s Encrypt HTTPS connection
We install the certbot client and the plugins for Apache
sudo apt install certbot python3-certbot-apacheRun the configuration wizard for Apache
certbot --apacheWe are asked for the email to which the notifications will be sent. There we put ours and press enter

Next, we will be prompted to accept the terms of service, for which we will press A and enter to continue.

It will then ask us if we want to share our email to which we can say yes or no by using “y” or “n” and then pressing enter.

Now the list of virtualhosts that we have configured will appear to specify the one we want to enable the certificate for https. In our case it is the only one that appears in the list with the number 1 so we enter 1 and hit enter.

Then it will ask us if we want the traffic to be automatically redirected to HTTPS or not, to which we will choose option 2 and press enter.
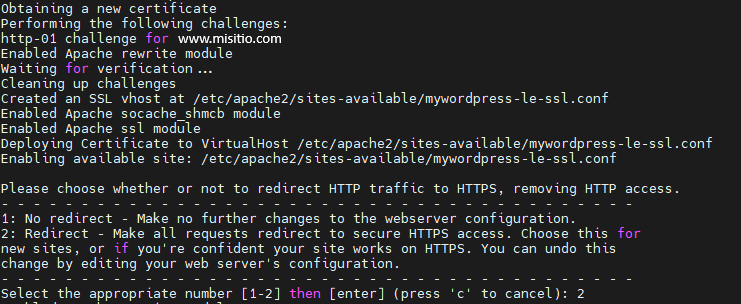
Next, all the information about the automatic configuration process will be shown to us as shown in the following image.
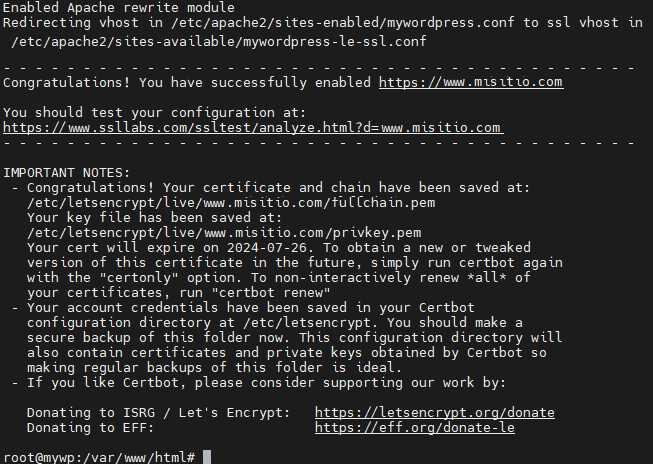
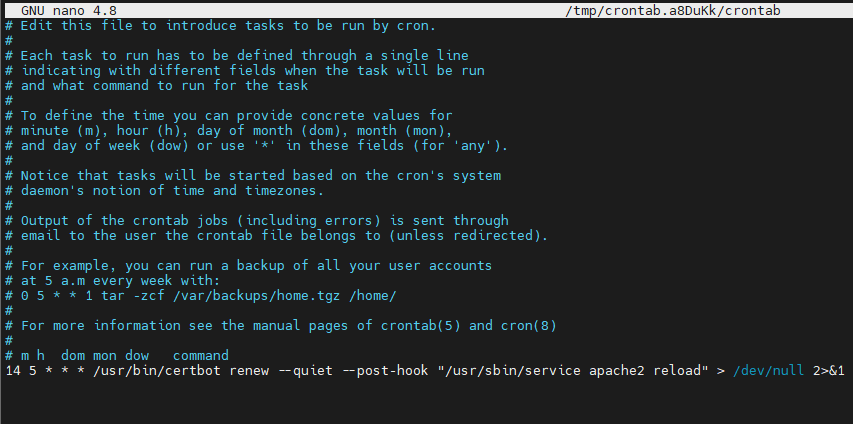
Now we are going to set the certificate to be automatically renewed, for that we will execute the command.
crontab -eand we will add the following line at the end
14 5 * * * /usr/bin/certbot renew --quiet --post-hook "/usr/sbin/service apache2 reload" > /dev/null 2>&1It should look like this
If everything went well, we can enter through the browser and we should see the WordPress page. This time you go through https and with the padlock correctly in the browser’s address bar. Now we proceed to install WordPress.
Instalar WordPress
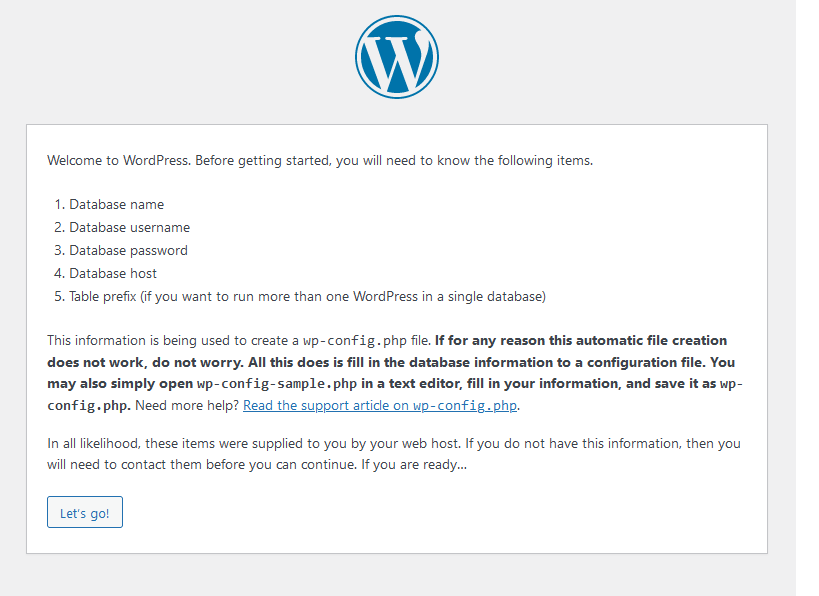
To begin we will click on the “continue” button

If everything is ready we should see the next page in which we will click on the button in the lower left corner “Let’s go!”
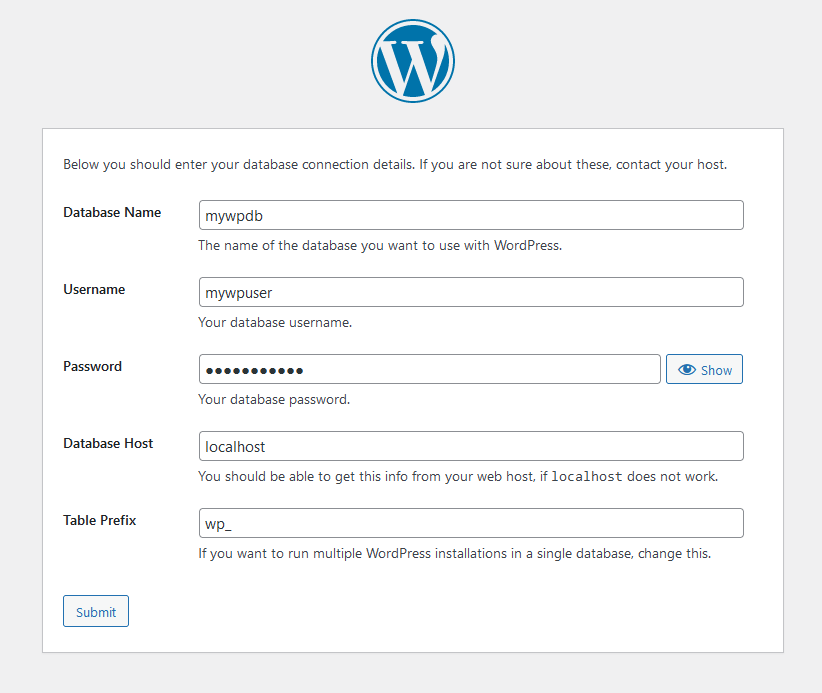
Next, we enter the data requested by the form and click on the “Submit” button in the lower left corner.
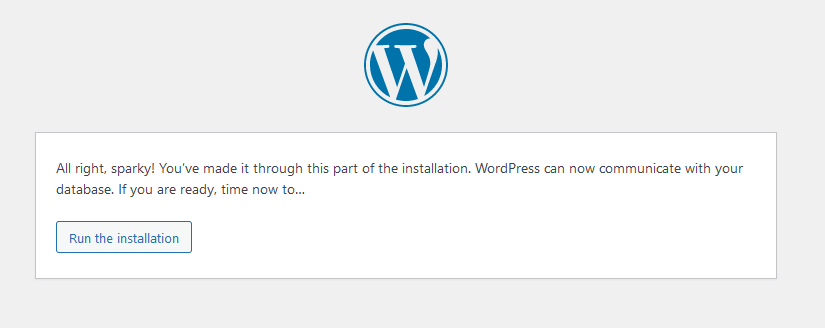
The first part of the installation is now ready, which is where WordPress access to the database is configured. Now let’s go with the second one. On the page shown below we click on the button that appears in the lower left corner “Run the installation”
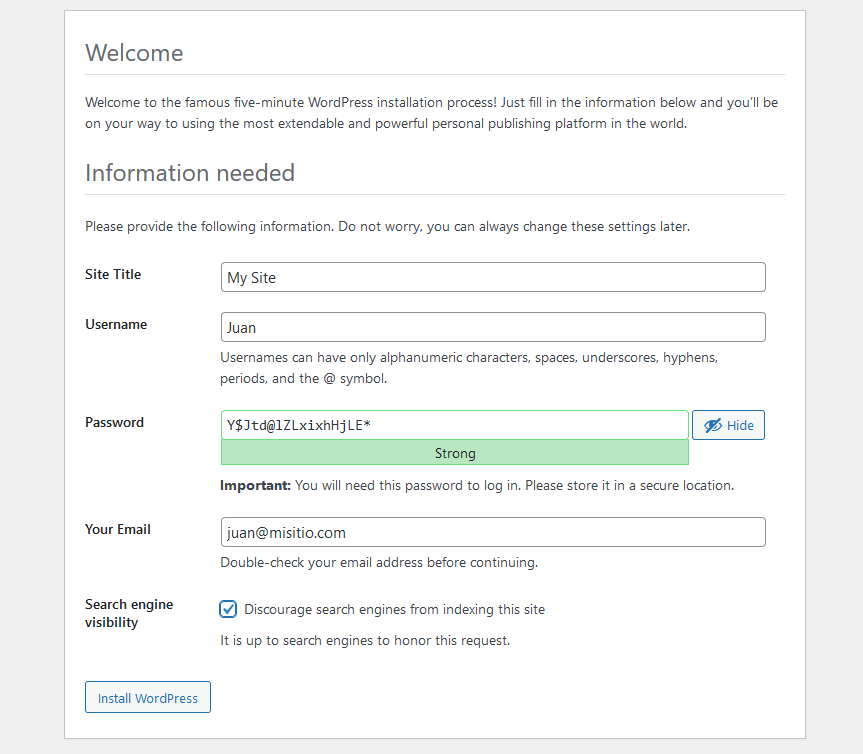
Now we will enter the title of the site, the username that we will use to manage our WordPress, the password which is generated automatically or we can specify one, the email to which WordPress will send the notifications, and we must check the selection box so that the engines search engines still do not index the site. Once all the data has been filled out, we must make sure not to forget the username and password and click on the button in the lower left corner that says “Install WordPress.”
In a few seconds the WordPress installation is complete and a page like the one shown below appears
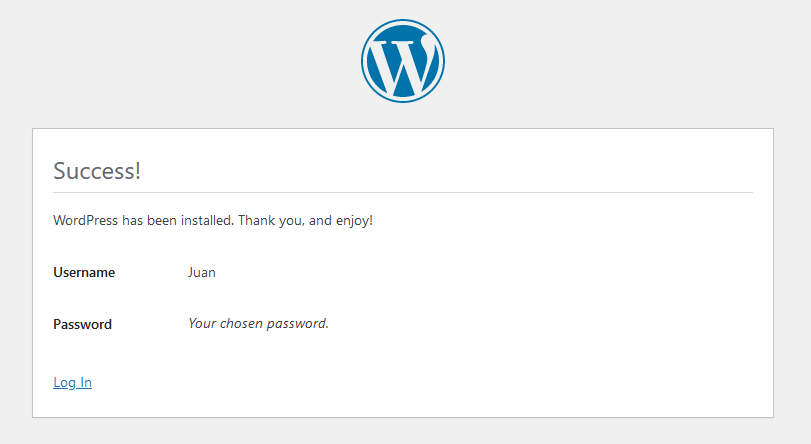
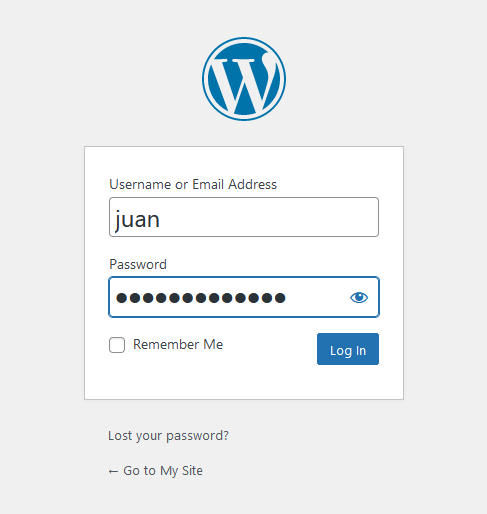
We can click on “Log In” and the access form will appear as shown in the following image.
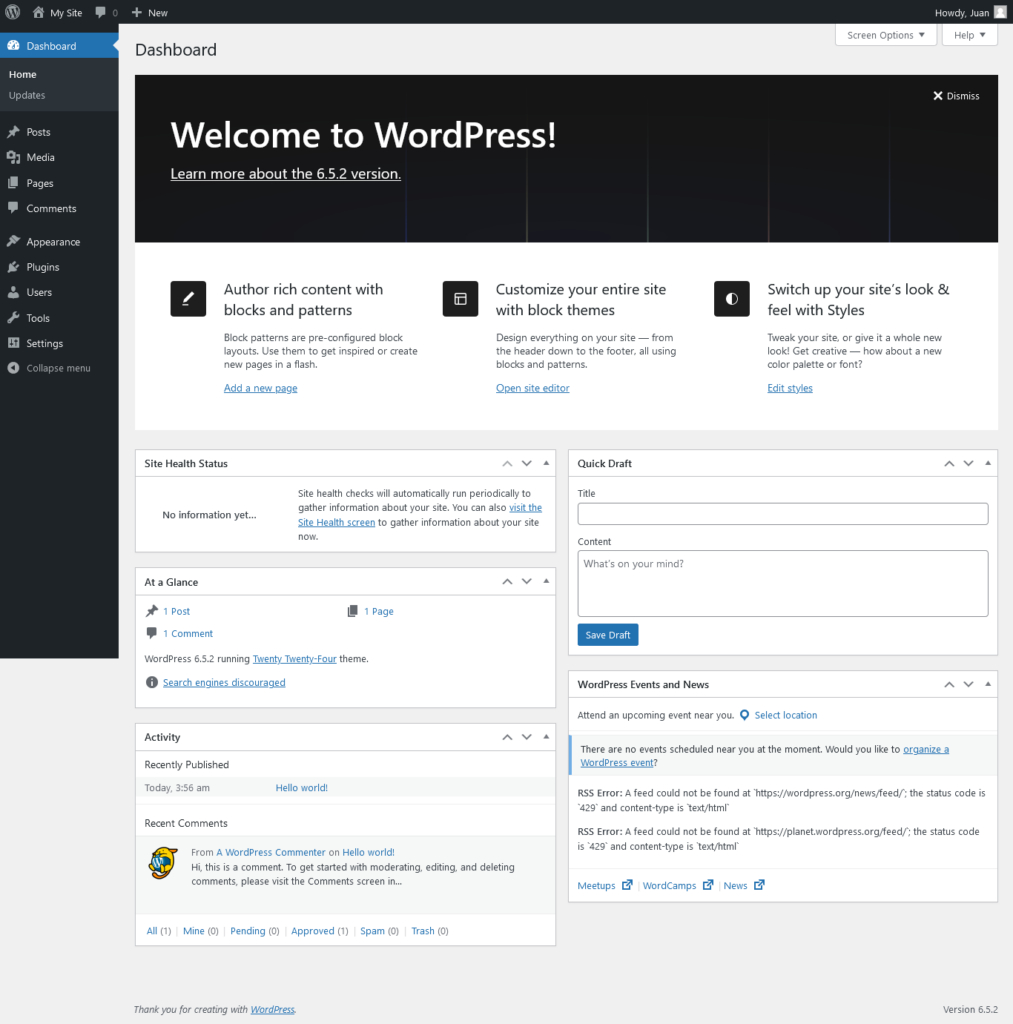
Once we have entered the username and password, we will access the WordPress administration panel from where we can do all the administrative work with this content manager.
We just have to make a couple of adjustments and we’ll be done.
Basic settings in WordPress
Finally we are going to add these two lines of configurations in the WordPress configuration file. The first is to disable the use of ftp so that WordPress can write directly to its folder and the second is to increase wordpress’s memory limit.
//disable FTP required for WordPress and plugin updates
define(‘FS_METHOD’, ‘direct’);
//Increase memory
define(‘WP_MEMORY_LIMIT’, ‘256M’);
For this we return to our VPS terminal and edit the configuration file
//-Edit the WordPress configuration file
nano /var/www/html/wordpress/wp-config.php
//- There add after the line "define( 'WP_DEBUG', false );"
// Paste these 2 lines
define('FS_METHOD', 'direct');
define('WP_MEMORY_LIMIT', '256M');Once these two lines have been added, we close the file saving the changes, with Control+X, then “Y” and finally Enter.
Finally, we have already finished installing our wordpress on the VPS from the terminal.
Accessing the WordPress administration panel
Remember that you can always access your wordpress admin panel by typing your site https://your-site-url+/wp-admin
Before we conclude, we will correct the permissions of WordPress on its directories, ensuring that files that should not be modified cannot be modified and disabling the execution of files from the uploads directory.
To ensure the security of your WordPress installation on a Linux server with Apache2, it is important to correctly set the permissions of files and folders. Here is a recommended configuration:
WordPress root folder (for example, /var/www/html/wordpress):
Permissions: 755 (directories)
Owner: The user that runs the Apache service (usually www-data).
Commands to use:
sudo chown -R www-data:www-data /var/www/html/wordpress
sudo find /var/www/html/wordpress/ -type d -exec chmod 755 {} \;
Files in WordPress folder:
Permissions: 644 (files)
Commands to use:
sudo find /var/www/html/wordpress/ -type f -exec chmod 644 {} \;wp-config.php (sensitive configuration file):
Permissions: 600 (only the owner can read and write)
Command to use:
sudo chmod 600 /var/www/html/wordpress/wp-config.phpwp-content/uploads folder (where files are uploaded):
Permissions: 755 or 775 (if you need write permissions for the group).
Commands to use:
sudo find /var/www/html/wordpress/wp-content/uploads/ -type d -exec chmod 755 {} \;
sudo find /var/www/html/wordpress/wp-content/uploads/ -type f -exec chmod 644 {} \;
Additional details:
Make sure permissions are as restrictive as possible. Apache should only have permission to read files, except in folders where uploading content is necessary, such as wp-content/uploads.
The owner of the files should be www-data (or the web server user), but avoid giving global write permissions.
So much for the installation of WordPress via command terminal on a VPS with Linux Ubuntu 20.04. In subsequent articles we will address other topics about WordPress and more advanced configurations in its deployments and servers.