
The Proxmox VE hypervisor server allows 2 ways to virtualize , the first is to create virtual machines , and the second is to create Linux-based containers (LxC) . In this guide we will see how to create a virtual machine in Proxmox VE step by step and what to do in each of the wizard tabs.
A Virtual Machine should be used when we are going to install an operating system from scratch (Microsoft Windows, GNU Linux, FreeBSD, pfSense, RouterOS (Mikrotik) or any other). To install said operating system, the easiest way to do it is using a disk image (.ISO) which we must upload to the local storage on the Proxmox VE Server.

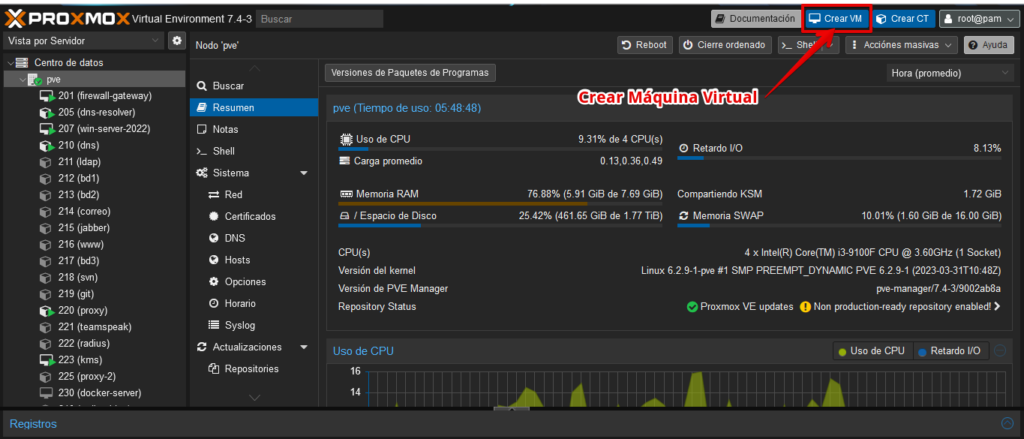
To create a virtual machine in Proxmox VE we are going to follow the following steps assuming that we already have a Proxmox VE server installed and running. We must access the administration website through a web browser using the URL https://ipdelservidorproxmox:8006. Once authenticated in the access form we must have a view like the one shown below in which we will select the “Create VM” button.
Once the button to create a virtual machine is pressed, a wizard will appear that will guide us through the creation process.
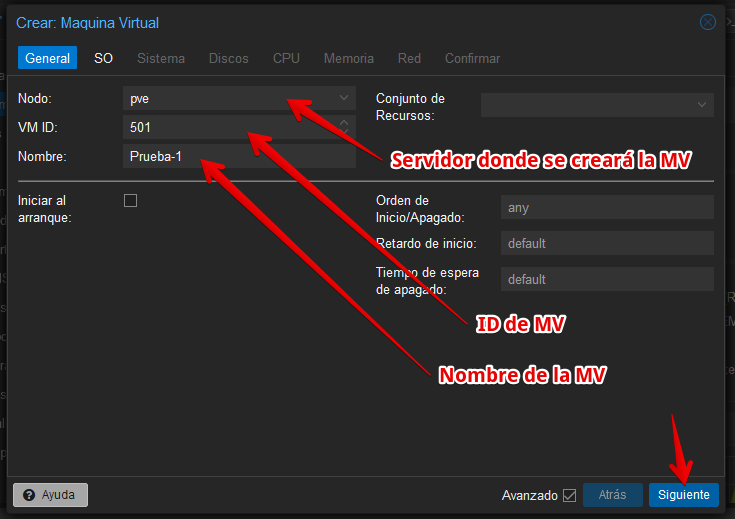
As a first option we have the Proxmox VE server in which we are creating the virtual machine, in the case of having several Proxmox VE servers in a cluster we could choose which of them the VM would be created in.
As a second option, we must specify the id (identification number) that our new virtual machine will use. It is important to know that it is a positive integer and must be greater than 100. We must take into account that there is no longer another virtual machine or container created with that same id.
The next step is to specify the identifying name that our new virtual machine will have.
In our case we will also mark the selection box that says advanced so that all the available wizard options are shown.
Having reviewed the previous points, we proceed to continue by clicking on the “Next” button to move to the next tab of the wizard.
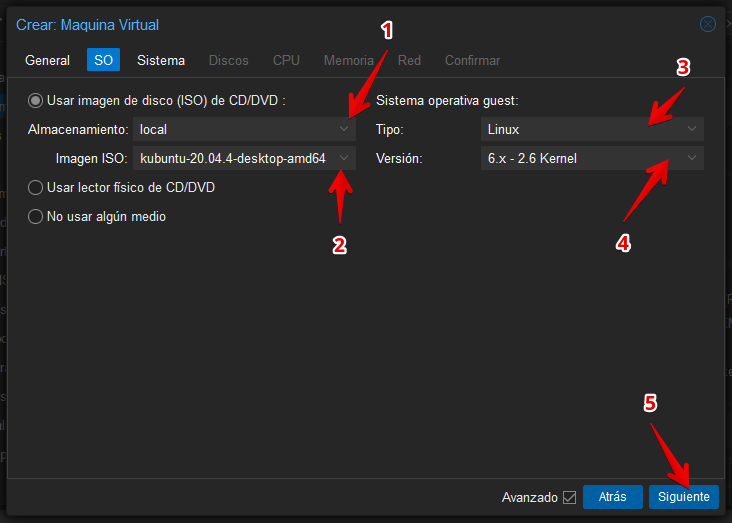
In this tab we have three options to use as the installation source which are:
1-Use CD/DVD disk image (ISO)
2-Use a physical CD/DVD reader (in case the server has one connected with an installation CD or DVD inserted)
3-Do not use any. (This option could be used to install from the network)
In our example we will choose the first option and select the storage (“Local”) and select the ISO file previously uploaded in our case (“Kubuntu-20.04-desktop-amd64.iso”).
The third step is to select the type of operating system that we are going to install, which options can be Linux, Microsoft Windows, Solaris Kernel or Others. In this case we will select Linux, since the ISO we uploaded belongs to the Linux family. In step 4 we will select the version that best suits the system we are going to install. To continue, click on the “Next” button.
In the System tab we are going to define the type of architecture that the virtual machine will have. If it does not have advanced requirements, we can leave it as i440fx. Otherwise we should select the other option which is q35 to emulate modern equipment with more advanced functions.
Step number two is to choose the type of BIOS firmware that our virtual machine will have. The SeaBIOS (Legacy Mode) and OVMF (UEFI Mode) options are available, here, like the previous step, we can choose the option according to the operating system that we are going to install. After that, in the third step is to choose the SCSI controller that we can leave as default. The 4th option is to enable the Qemu agent, which is the software that Proxmox uses to run virtual machines. This is software that is installed on the operating system after the virtual machine installation is complete. It must be done manually to achieve the best possible integration between the virtual machine we are creating and the virtualization server (Proxmox-VE).
The 5th step is whether or not to enable TPM Chip emulation. We will do this based on the requirements of the operating system that we are going to install on the virtual machine. If this requires it then we enable the option. Otherwise we can leave it disabled and click “Next”. The options discussed above are highlighted in the following image.

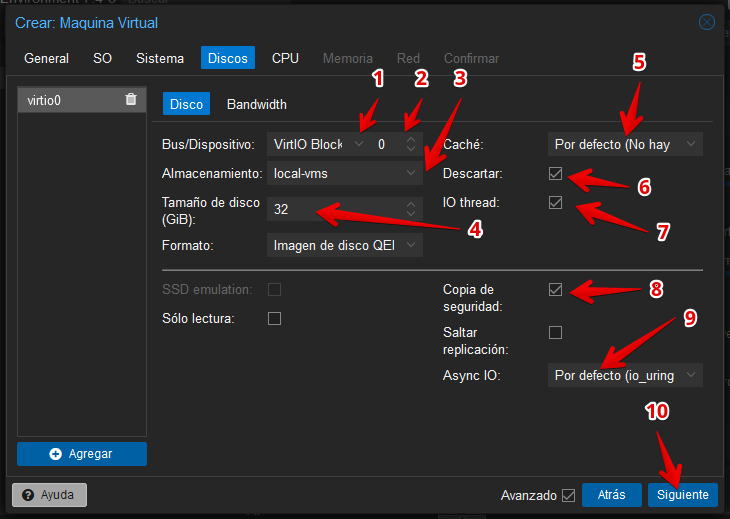
The next tab of the configuration wizard is the virtual machine disk configuration. As a first step we will choose the type of Disk Bus that the VM will have, having the IDE, SATA, VirtIO Block, and SCSI options available. Depending on the type of bus selected, it may require additional drivers in the operating system of the virtual machine we are creating. In the case of Proxmox VE, the most efficient bus is VirtIO Block so whenever we can use it, we will choose this option. We must keep in mind that operating systems such as Windows will ask us for drivers during installation for this type of device. Therefore, it will be necessary to have the ISO of these and add a second CD drive to the virtual machine to put them on.
The VirtIO drivers ISO can be downloaded from the following link: https://fedorapeople.org/groups/virt/virtio-win/direct-downloads/archive-virtio/ being the latest available at the time it was released. This guide is being prepared by
virtio-win-0.1.229.iso
Step number two is to choose the device number on that bus. You should keep in mind that depending on the type of bus chosen, there may be more or fewer devices that are supported, starting from scratch.
Step 3 is to select the storage where we will save the virtual hard drive we are creating.
Step 4 is to specify how much space the virtual disk will have available. You must keep in mind that the storage selected in the previous step has that free space.
As step 5 we could choose the type of cache that will be used to store the virtual disk data, having several options available. We recommend “Write back” if the server has an electrical backup. Otherwise, the recommended option would be “Write through”, which prevents data from being lost if the server is disconnected from the power supply or the power supply fails.
Step 6 is to check the “Discard” selection box, this means that when data is deleted from the virtual machine, it is discarded from the file that represents the virtual hard disk and the real space it occupies decreases.
The 7th step is to enable the use of multiple threads of execution, to handle the input and output processes. This improves the performance of our virtual hard drive.
The 8th step is to verify that the “Backup” box is activated. This option, if active, allows the content of the virtual disks that have this option selected to be included when a backup copy of this virtual machine is made.
Number 9 is choosing the type of asynchrony for input-output processes. In this case we recommend the “Threads” option to gain a little additional performance although it could be left at its default value.
The last step 10 in this tab would be to click on the “Next” button to continue.
The following image shows each of the options described above marked and numbered.
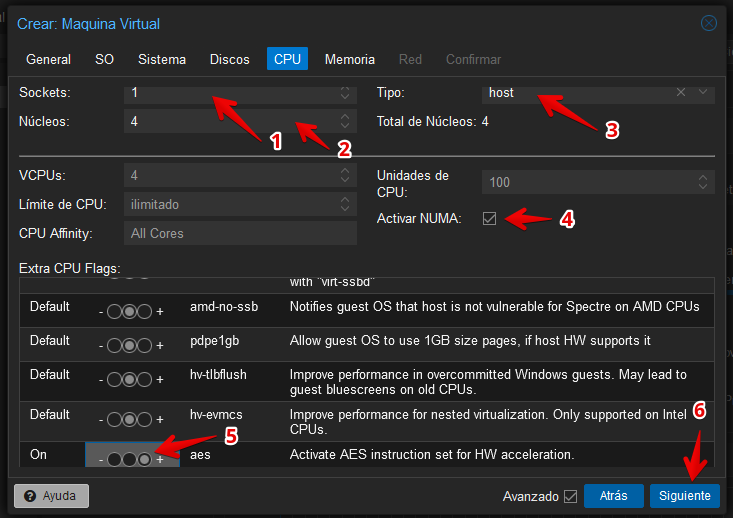
In the CPU tab, we will specify the number of sockets and cores that our virtual machine will have, as well as the type of microprocessor it will use, being able to emulate many options. The most recommended option is the host option, as it would use the same microprocessor model as the real machine where the Proxmox VE runs. It is important to say that for this option to work, the microprocessor where the Proxmox VE server works must have support for virtualization and this must be activated in the server’s BIOS. Otherwise this option cannot be used and some other type of microprocessor will have to be emulated.
If we specify more than one core, it would be advisable to enable NUMA.
We could also activate the “aes” option in the additional functionalities of the microprocessor. This option will allow you to use the acceleration for encryption algorithms available in the microprocessor. If the machine gives an error when trying to start it, we deactivate this option.
Once we have seen all the previous points, we click next to continue.
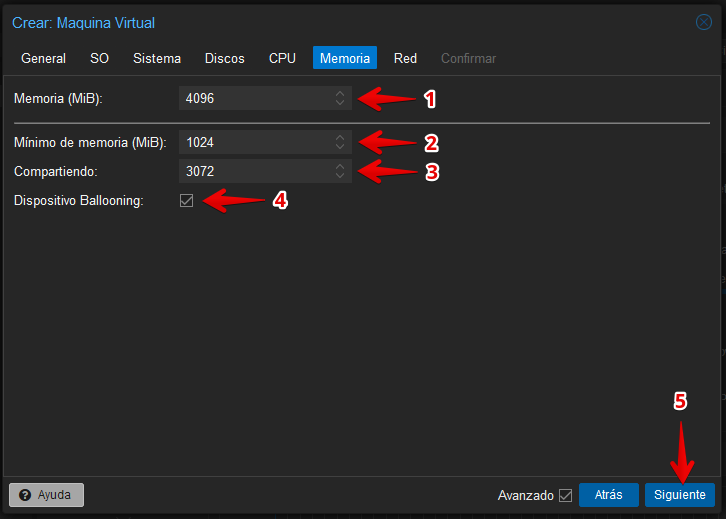
The next tab of the wizard is Memory. In this we will specify how much RAM our virtual machine will have, breaking it down into how much it will have reserved for its exclusive use and how much it can share with other virtual machines.
In the case of the example we assign 4 gigabytes of RAM to this virtual machine. Of those 1 gig is exclusive memory for the virtual machine and the other 3 gigs will be shared among other machines if they are required and are not in use. We can also activate the option to emulate an expansion device. This can increase or decrease depending on what is required. We must take into account that this free memory exists on the server to try not to fall into over-provisioning. (Assign more resources than can be assigned).
Once these points have been clarified, we click on the “Next” button.
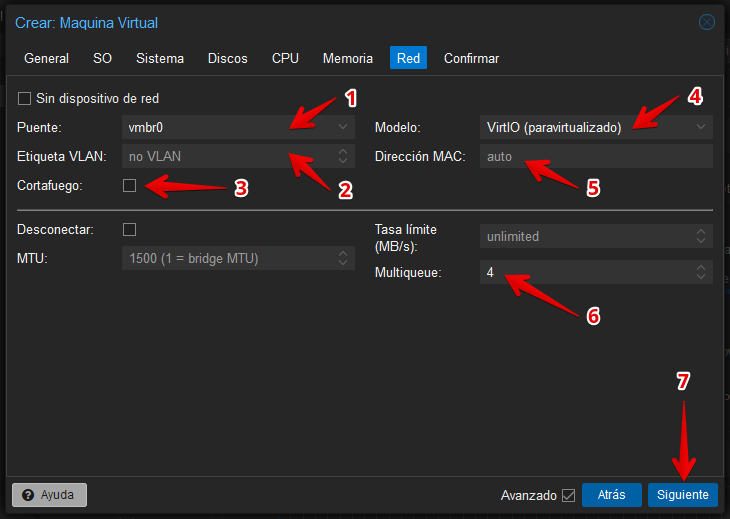
Once we reach the “Network” tab, we specify which Proxmox VE network bridge the virtual machine will be connected to, if it uses vLans and if it is protected by the Proxmox VE server firewall. In step 4 we will specify what type of network controller will be used. The most efficient and performing type in Proxmox is VirtIO, but it will require additional drivers in operating systems such as Microsoft Windows.
In step 5 we can specify the MAC address that will be available in case it is required to have a specific one.
As an advanced option we can specify number 6, in which we will enable multiple queues, which increase the server’s capacity to handle network traffic. This option must have the same value as the number of cores assigned to the virtual machine in the CPU tab.
Finally, we click on the “Next” button to continue.
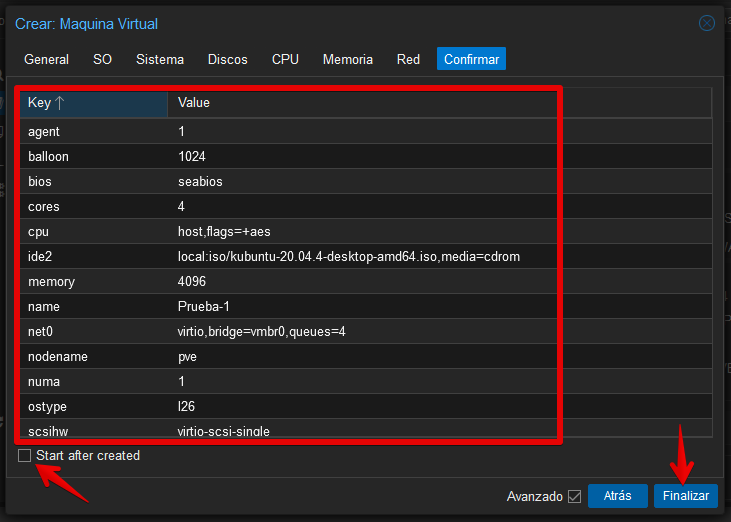
Upon reaching this “Confirm” tab, we are shown a summary of all the options chosen for us to verify. If necessary we can move to any of the tabs above and change the options again.
We also have an option to specify that the machine will be turned on once it is created or we can leave it unchecked and do it manually whenever we want.
To finish the virtual machine creation process, we click on the “Finish” button as shown in the following image.
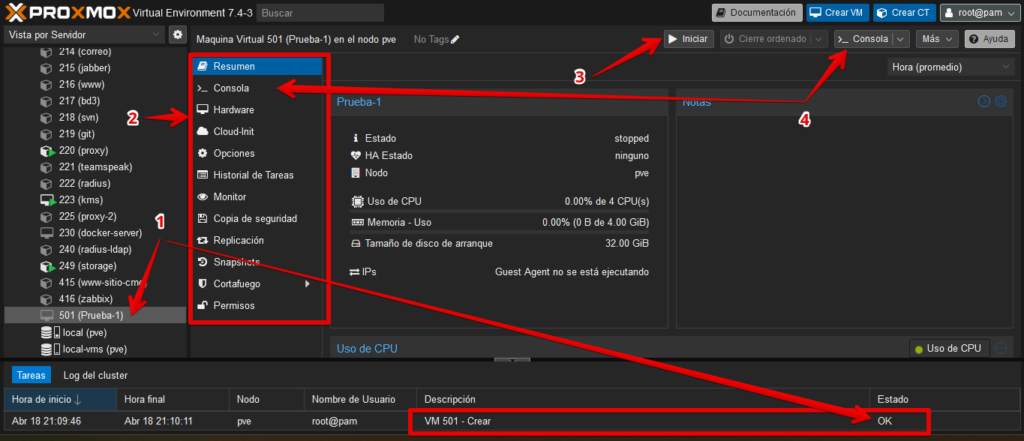
If everything has gone well, the message that the machine has been created “OK” should appear in the lower panel. Now it should appear in the left panel where we will select it by clicking.
Once the virtual machine is selected, the panel indicated with 2 in the image will be displayed where all the options regarding the virtual machine that we have created will be shown.
Later, in the third step is to turn on the equipment, which should turn on. In case of failure, the virtual machine options must be reviewed with respect to the microprocessor and the “aes” function.
The next case is to access the machine console through any of the two ways indicated in the image below.
In the panel marked with the number 2 in the previous image we have several configuration and operation options on the selected virtual machine in the form of a vertical menu.
Configuration and operation options:
- Summary (Overview with information on the consumption of allocated hardware resources)
- Console (VM screen output, this is what you would see on the monitor on a real machine)
- Hardware (List of virtualized hardware in the VM, provides options to manage them)
- Cloud-init (Options for deployments to the Proxmox VE cloud service)
- Options (General VM options, include auto power on, boot order, etc.)
- Task history (Record of operations performed on the VM)
- Monitor (Hypervisor server console to manage this specific VM)
- Backup (options to manage full VM backups)
- Replication (Options to manage VM replication)
- Snapshots (Management of incremental copies over time or returning to a previously marked state of the VM)
- Firewall (Options to configure the Proxmox VE firewall for this machine specifically)
- Permissions (Manage permissions on the VM)
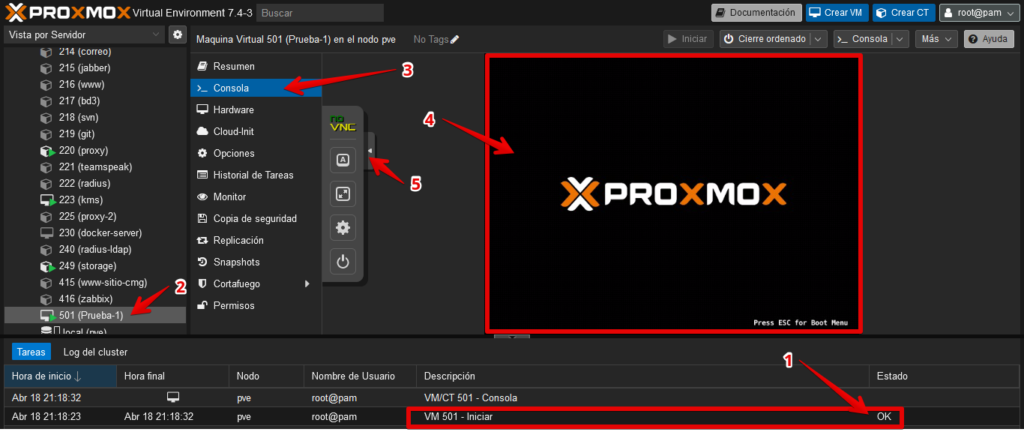
Finally, we verified that the machine turned on correctly. For that we look at the task added in the bottom panel as shown in the image below. In the left panel, the virtual machine icon should have a green “play” indicator.
The next step (3) is to access the console to see the virtual machine screen which can be seen in the box indicated by the number 4.
We also have options hidden in panel 5 to send special key combinations to the machine. For example, go full screen, make scaling adjustments, or control virtual machine shutdown options.
At this point, we have already created our virtual machine and we can proceed to install the selected operating system. From now on the behavior of our virtual machine will be practically the same as a real computer. Except for a slight performance decrease due to hardware virtualization, which in some cases is 3%.
So we can now use our virtual machine both directly and over the network, as if it were a real computer connected to our network.
After following this guide you should be able to know the steps to create a virtual machine in Proxmox VE 7.4