Proxmox VE can run both QEMU/KVM virtual machines and Linux LXC containers. Both isolate workloads, but they do so at different layers.
A virtual machine has its own kernel. An LXC container shares the Linux kernel of the Proxmox host and isolates processes, users, networking, resources, and filesystems through namespaces, cgroups, AppArmor, seccomp, and other kernel mechanisms.
This gives containers very low overhead and fast startup, but they can only run compatible Linux systems. Windows and FreeBSD cannot run inside a normal Proxmox LXC container.
Proxmox classifies these guests as system containers: they contain a complete Linux userspace with init, services, users, and packages. They are not the same thing as an application container such as a Docker container.
For comparison, see our Proxmox VE virtual-machine guide and our introduction to virtualization.
What changed after Proxmox VE 7.4?
Proxmox VE 9.2 was released in May 2026 and includes LXC 7.0. The GUI workflow remains very similar to the one shown in these screenshots, but modern deployments should pay particular attention to:
- unprivileged containers as the preferred security model;
- SSH public keys in addition to passwords;
- features such as
nesting,keyctl, FUSE, and device access; - managed mount points and bind mounts;
- which volumes are actually included in backups;
- snapshot and replication support provided by the underlying storage;
- the fact that running Docker inside LXC is not Proxmox’s first-choice architecture for application containers.
LXC vs. Docker: different layers
A Proxmox CT is intended to behave like a small Linux server. Docker and Podman normally provide application containers.
Docker can run inside some LXC setups by enabling features such as nesting and, in some unprivileged configurations, keyctl. However, Proxmox documentation recommends a QEMU VM for application-container engines when stronger isolation and fewer dependencies on the host kernel are important.
Do not enable nesting, keyctl, FUSE, extra mount capabilities, or device access “just in case.” Each additional capability weakens part of the container boundary.
1. Manage LXC templates
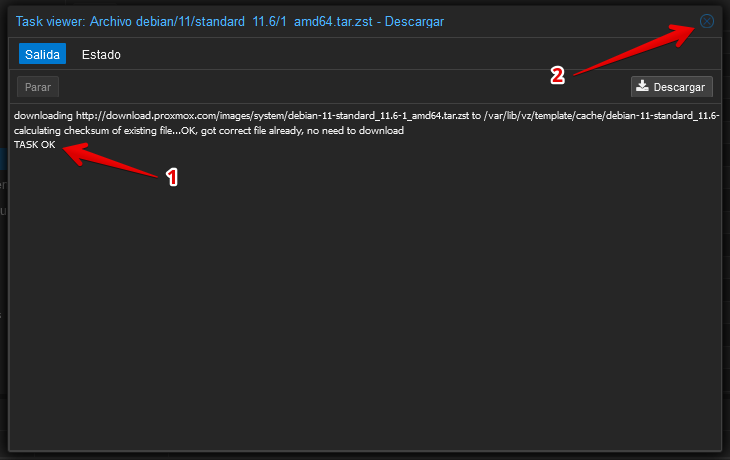
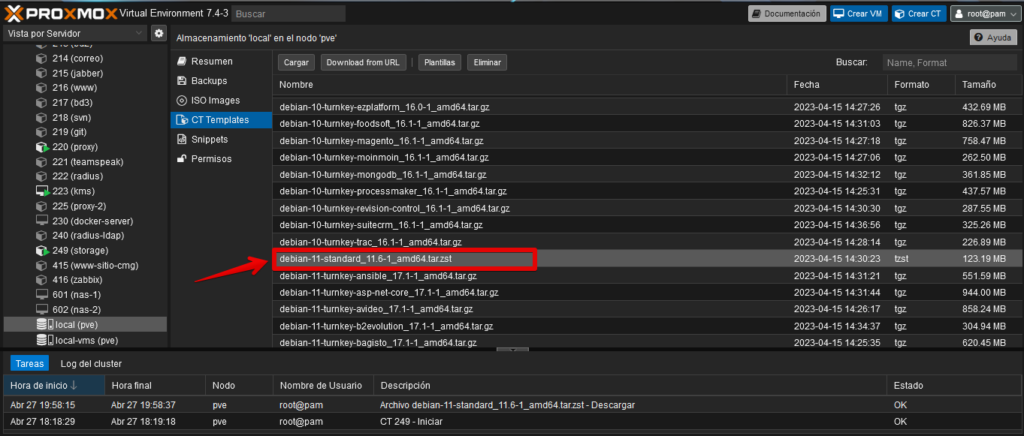
Containers are usually created from templates. The target storage must allow the Container template or vztmpl content type.
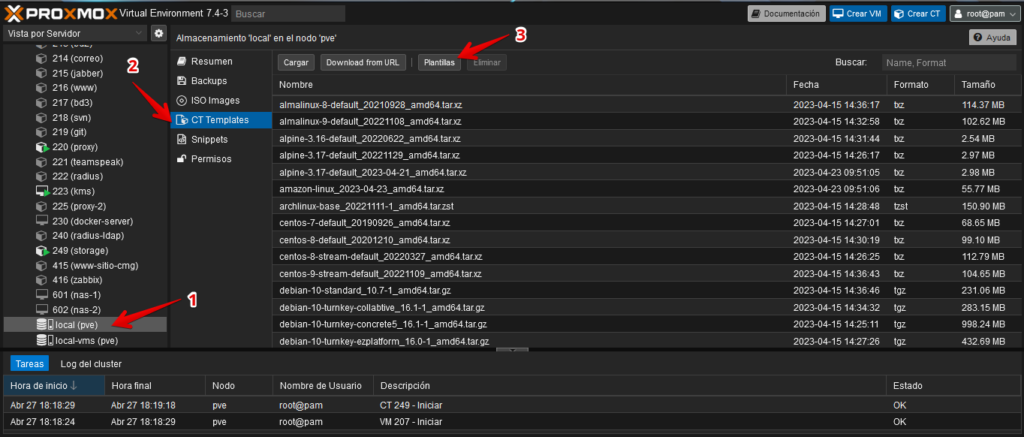
The web interface can upload an existing template, download one from a URL, or open the catalog maintained through the Proxmox Appliance Manager.
The same catalog is available from the CLI:
pveam update
pveam available
and a template can be downloaded with:
pveam download local TEMPLATE_NAME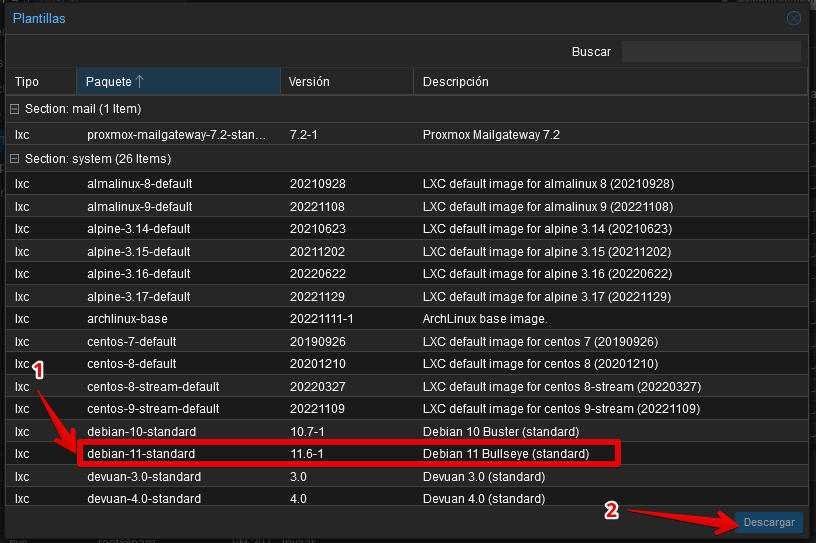
Proxmox integrates with distributions such as Debian, Ubuntu, Alpine, Fedora, Arch Linux, openSUSE, Gentoo, Rocky/AlmaLinux, and others. The exact template versions change over time, so check the current catalog instead of assuming an older release is still available.
2. Open Create CT
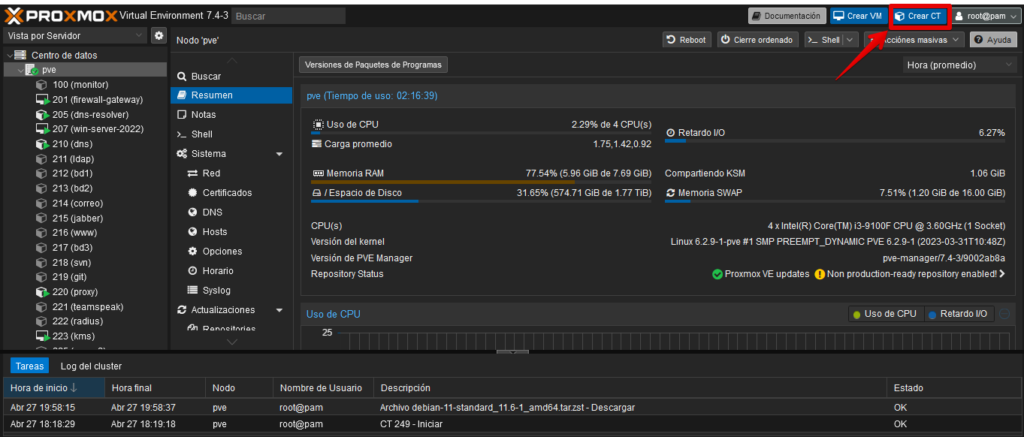
The equivalent workflow in Proxmox VE 9.2 remains very similar.
3. General: CT ID, hostname, password, SSH, and privilege model
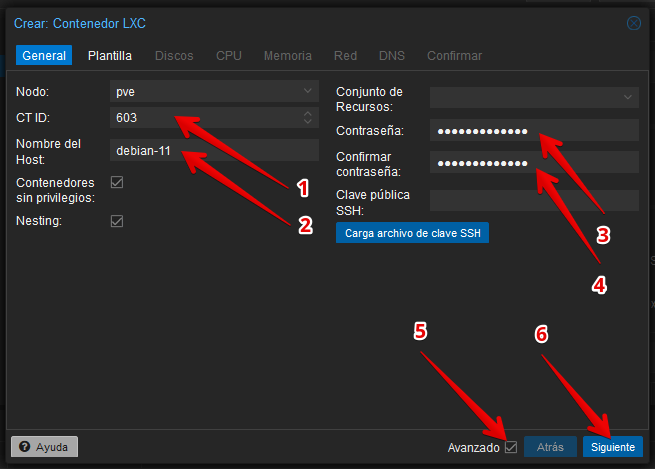
The CT ID must be unique across the cluster. IDs below 100 are reserved internally, so normal containers use IDs beginning at 100.
The hostname should fit the DNS naming policy of the network.
A root password can be configured, but current Proxmox also makes it easy to provide an SSH public key at creation time. For remote administration, key-based authentication is normally preferable.
Unprivileged containers
This is one of the most important security choices.
In an unprivileged container, UID 0 inside the CT is mapped through user namespaces to an unprivileged UID on the Proxmox host. This reduces the impact of many potential container escapes and resource-abuse bugs.
Proxmox uses unprivileged containers as the normal default in the GUI and recommends them for most workloads.
A privileged container can be easier when a workload needs unusual filesystems, devices, or permission semantics, but the security boundary is weaker. Use it only when you understand the requirement.
4. Template
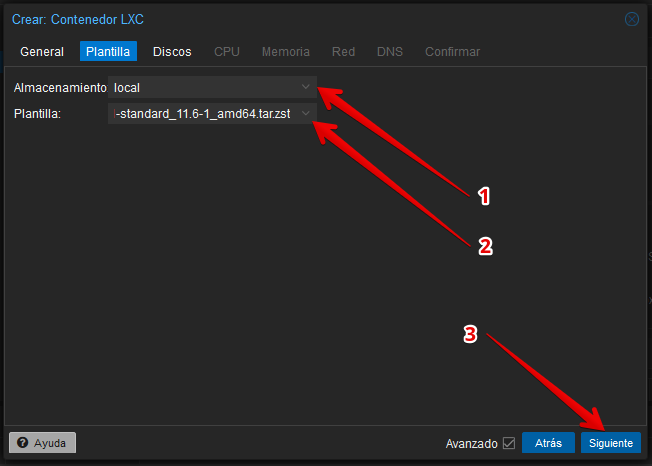
The template contains a prepared Linux filesystem. It is not an ISO that needs to go through a normal installation process.
After creation, treat the CT like any other server: update packages and apply the distribution’s security policy.
5. Root Disk
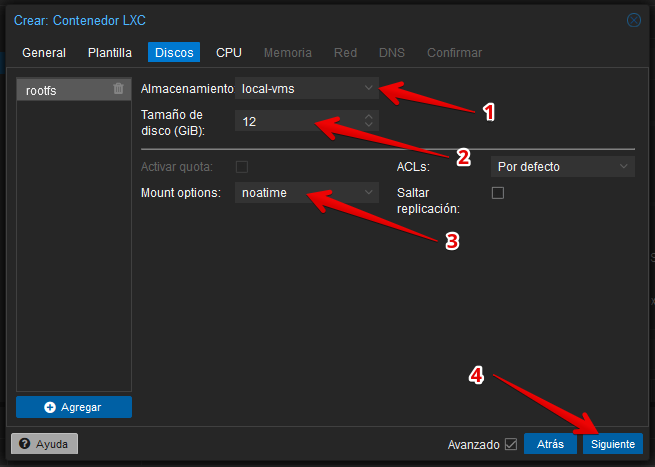
Choose an appropriate managed storage backend and rootfs size.
The old guide recommended noatime as a general performance tweak. It can reduce access-time writes, but modern filesystems already use policies such as relatime, so there is no need to force it on every CT.
The more important decision is the backend itself. ZFS, LVM-thin, Ceph, and directory storage have different snapshot, replication, and thin-provisioning behavior.
Additional mount points
A CT can also receive additional mount points. Proxmox distinguishes between:
- storage-backed mount points managed by the Proxmox storage layer;
- bind mounts exposing a host directory inside the CT;
- device mounts for specific hardware-access scenarios.
Bind mounts require special care: their contents are not included in normal vzdump backups. They can also create UID/GID permission issues in unprivileged containers.
Do not bind-mount sensitive host paths such as /, /etc, or /var into a container.
6. CPU
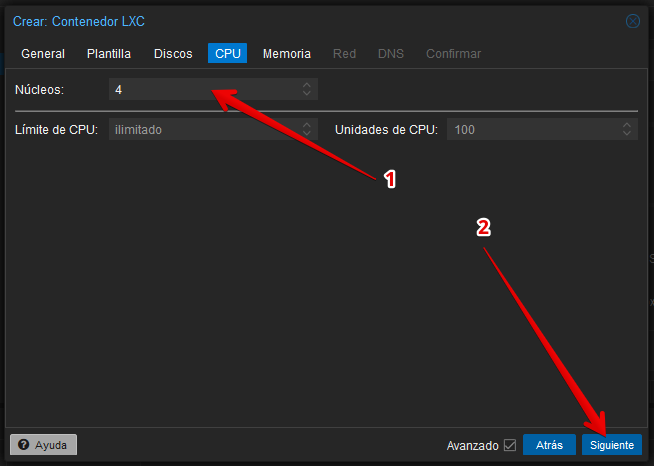
A container does not receive emulated virtual CPUs in the same way as a VM. Container processes are scheduled directly by the host Linux scheduler.
The Cores value restricts how many CPUs the CT can use. If no core restriction is set, the container can use all available CPUs subject to the remaining scheduler and cgroup limits.
CPU limit and CPU weight settings can further control how much processor time a container receives during contention.
7. Memory and swap
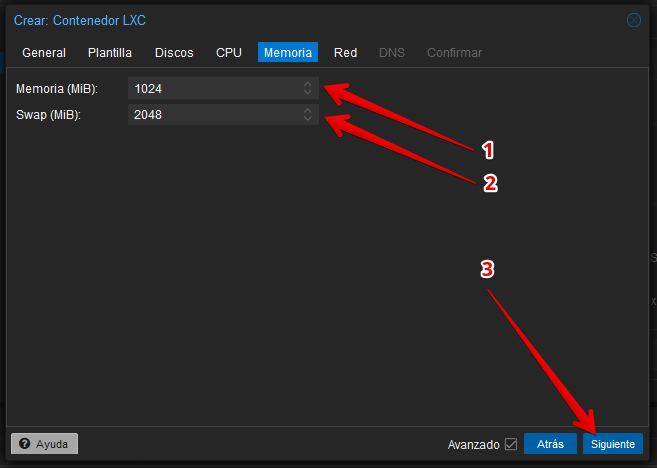
Containers share host physical memory and enforce limits through cgroups. There is no separately emulated RAM device in the VM sense.
The memory setting limits RAM consumption by CT processes. The swap value controls how much swap the CT may consume under host policy.
Containers are lightweight, but aggressive overcommit can still exhaust the host and affect every guest on the node.
8. Network
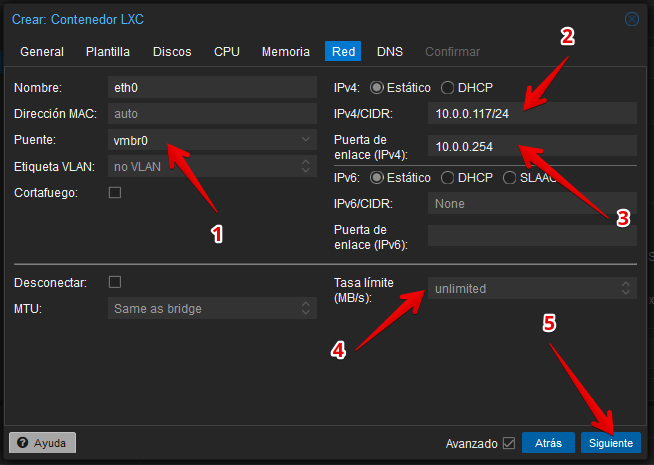
The CT normally receives a veth interface connected to a Proxmox bridge such as vmbr0.
Depending on the design, configure static IPv4, DHCP, IPv6, VLAN tagging, Proxmox firewall integration, and rate limiting.
Do not copy addresses from screenshots. The IP prefix and gateway must match your own network.
9. DNS
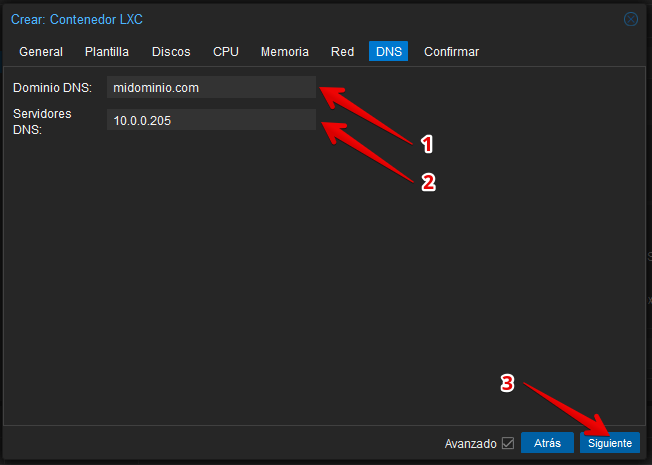
If search domain and nameserver are left unset, Proxmox can inherit those values from the host.
Enterprise and lab networks may depend on internal DNS for Active Directory, LDAP, service discovery, or split-horizon zones, so public resolvers should not be substituted automatically.
10. Confirm
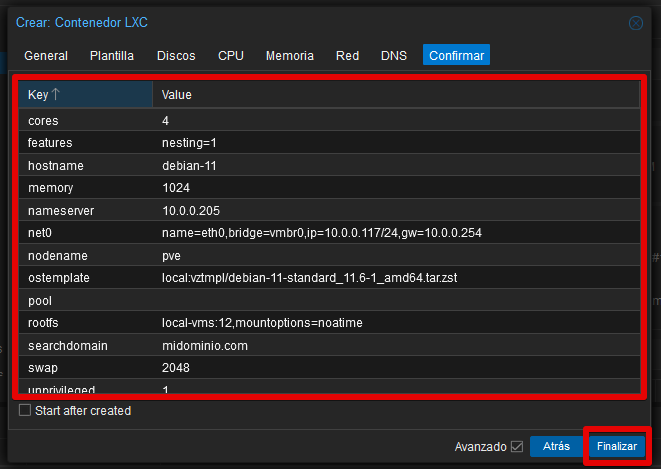
Check the CT ID, hostname, privilege model, template, storage, CPU, memory, bridge, IP/VLAN/gateway, DNS, and whether the CT should start automatically when creation completes.
11. Create the container
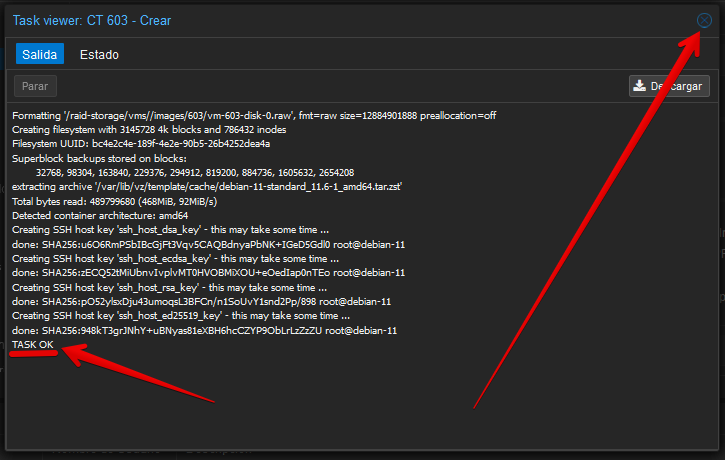
A CT is normally created much faster than a traditional OS installation because the template already contains a prepared userspace.
12. Container resources and management
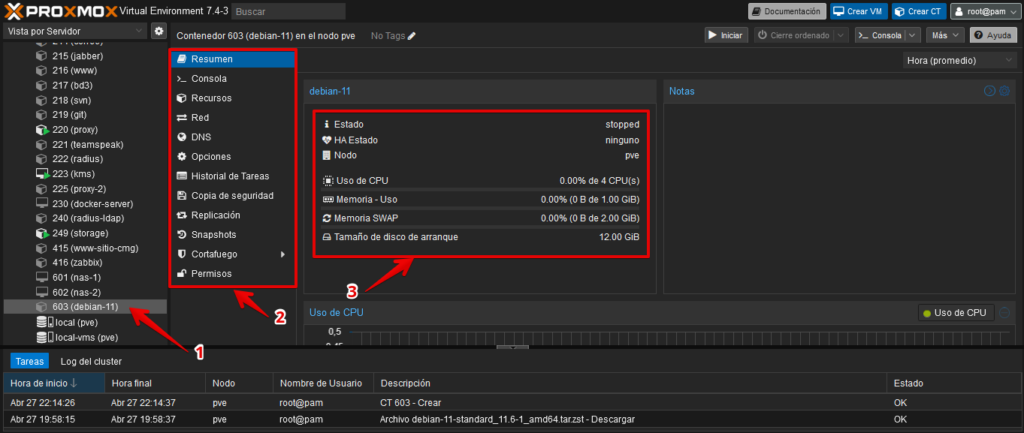
From here, manage resources, networking, DNS, startup options, backups, snapshots, replication, firewall rules, and permissions.
Snapshots are not backups
A snapshot normally depends on the same storage that holds the CT. If that storage fails, snapshots can be lost with it. Backups should live on separate, appropriately protected storage.
Replication depends on storage
The presence of a Replication menu does not mean every CT can be replicated through every backend. Integrated Proxmox replication depends on the storage and cluster design, with local ZFS being a common case.
Backups and mount points
Managed volumes can be included in vzdump according to their configuration. Bind mounts are not backed up as part of the CT backup and require an independent data-protection plan.
13. Start the CT and open the console
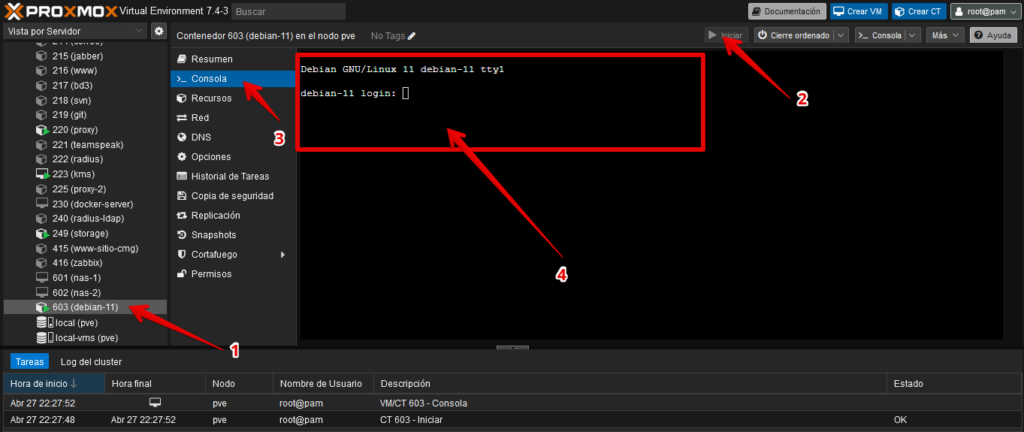
After starting the CT, use the web console, SSH, or enter its namespaces directly from the host:
pct enter CTIDDisplay its Proxmox configuration with:
pct config CTIDUpdate the container immediately
The template may be older than the latest security updates. On Debian or Ubuntu, for example:
apt update
apt full-upgrade
Then install only the services that the CT actually needs.
Nesting, keyctl, FUSE, and devices: enable only when required
Under container features, Proxmox can expose additional capabilities.
nesting enables certain nested-container scenarios, but exposes more host procfs and sysfs information to the guest.
keyctl allows kernel keyring operations and may be needed for some Docker setups inside an unprivileged CT.
FUSE and extra mount types also have security and backup implications.
The safest approach is least privilege: enable only the feature required by the workload.
Docker inside LXC?
This is popular in home labs and can work, especially in carefully configured unprivileged containers.
However, “works” is not the same as “recommended everywhere.” Proxmox recommends a QEMU VM for application-container platforms when you want strong isolation, a dedicated guest kernel, and predictable compatibility with Docker or Kubernetes.
Traditional Linux services—DNS, reverse proxies, web services, monitoring, internal tools—can be excellent LXC workloads. Software that expects deep control of namespaces, cgroups, netfilter, kernel modules, or device access is often easier to operate inside a VM.
When should you choose LXC or a VM?
| LXC | QEMU/KVM VM |
|---|---|
| Linux only | Linux, Windows, BSD, and other guest OSes |
| Shares the host kernel | Own guest kernel |
| Very low overhead | Stronger isolation |
| Very fast startup | Full operating-system boot |
| Excellent for many Linux services | Best for workloads needing a private kernel or stronger boundary |
| Special hardware/features may need additional host integration | Virtual devices and PCI passthrough provide a more independent hardware model |
Container migration
Containers can migrate between cluster nodes, but this is not the same as transparent VM live migration.
Proxmox supports restart migration workflows that can reduce service interruption, but the CT is stopped or restarted during part of the operation.
A sensible Proxmox VE 9.2 LXC baseline
- unprivileged CT;
- current official Debian, Ubuntu, Alpine, or other appropriate template;
- administrative SSH key;
- CPU and memory limits sized for the service;
- rootfs on Proxmox-managed storage;
- veth connected to the correct bridge;
- Proxmox firewall enabled when the platform firewall policy is in use;
- no nesting/keyctl/FUSE unless needed;
- scheduled backups on independent storage;
- explicit documentation for external bind mounts.
Why preserve this Proxmox VE 7.4 guide?
The screens are still useful because the LXC wizard has evolved incrementally. What needs updating is the technical interpretation around security, storage, backup behavior, and container features—not the historical screenshots themselves.