In this article, we will see how to install VirtualBox and some of its basic configurations on a Microsoft Windows system. In all versions of Microsoft Windows (XP, Vista, 7, 8, 8.1, 10, 11, Server) the procedure is the same.
Download the VirtualBox Installer and Extension Pack
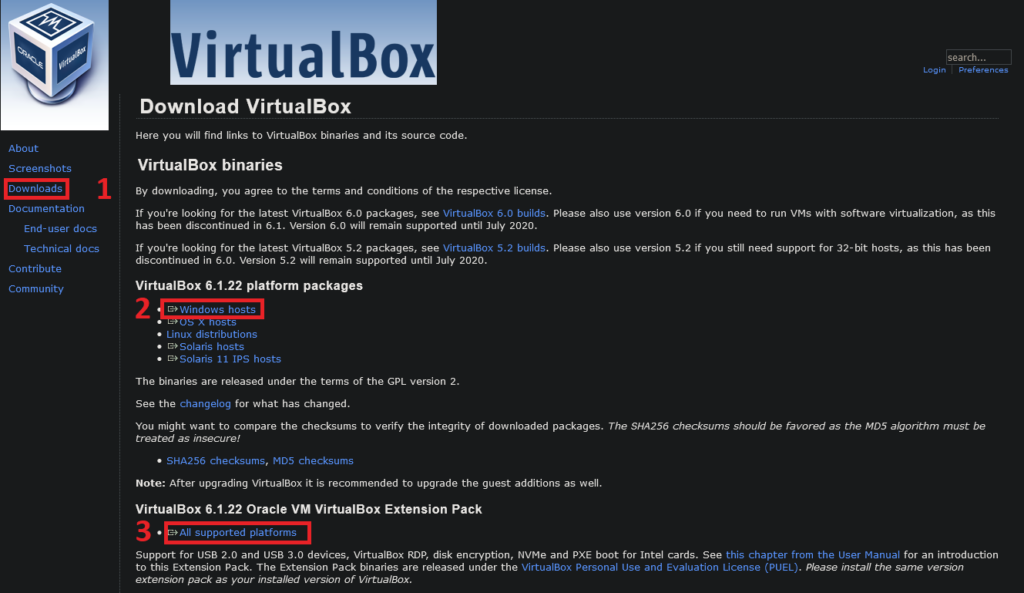
The best place to download the installer and extension package is its official site, https://www.virtualbox.org. Once on the website, we go to the Downloads option in the navigation panel on the left and on the page that appears we select the installer, then the extensions package as shown in the following image.

The VirtualBox installation program
After having downloaded both files to our computer we are going to proceed with the installation program, for that we execute the executable file (.exe)

Once the installer has been executed, the Welcome to the installation program is displayed as in the image below, we proceed to the “Next >” button to continue.

Next, the window appears to select the products to install and, if required, change the installation destination. In our case, we will leave everything as is and proceed to click on “Next >” to continue.

The next window that appears, it gives us the possibility of removing the direct links that will be created and the VirtualBox file association. In our case, we leave them all checked and click on “Next>”.

The following window notifies us that during the installation of the network adapters that VirtualBox will use, connectivity will be restarted and there may be a momentary loss of connection, we click on “Next>” to continue.

Upon reaching this window, everything is ready to install, click on “Install”.

In this window you can see the progress of the installation.

At some point, a window like the one in the image below may appear, in which we must choose the “Yes” option to continue.

Once we reach this window, the VirtualBox program will be installed on our computer, we leave the check box marked and click on “Finish”.

The following image shows a window with the main interface of VirtualBox, and now we proceed to install the extensions package.

Installing the extension package for VirtualBox
To install the extensions package, we go to the File menu and select the Preferences option as shown in the image.

In the Preferences window, we decide the “Extensions” option in the left panel and click on the icon in the upper right that has the plus sign.

When the open dialog box appears, there we proceed to locate the other file that we had downloaded.

Once the file is selected, a window like this appears, in which we will click on Install. The features that this extension package incorporates into our newly installed VirtualBox appear in the Description.

Once you have clicked on install, the VirtualBox License window appears, in which all the legal terms of use are explained. In order for the “I accept” button to be activated, you must lower the scroll bar to the end of the text.

If the package installation has been successful, a notification like the one shown in the image will be displayed.

Basic configuration
In the Preferences window you can establish some basic settings, for now we will only limit ourselves to changing the location where the virtual machines that we will create in VirtualBox will be saved. To change the location, we choose the first option “General” and change the value in the drop-down list in which we will choose “Other…”. There, a dialog box will appear to select in which folder we want to save future virtual machines. It is important to select a location where there is enough free space for the virtual machines that we will create. Then we click accept to save the changes.

If you have come this far, then you already know all the necessary steps to install VirtualBox on Microsoft Windows.
You can stay up to date with the other articles in this VirtualBox series.


